Welcome to another episode of the “chess noob Game Review” series where the focus will be on identifying in how a game, whether I win or lose, could have been improved. This gives me an opportunity to reflect more deeply about a game and hopefully, the lessons that I draw for myself will be helpful to my fellow beginner and beginner-intermediate chess players!
I haven’t made one of these videos and articles in a while, but I think that there are some lessons from the mistakes that I made in this game! I had the Black pieces and my opponent attempted to play the Vienna Gambit against me (1. e4 e5 2. Nc3 Nf6 3. f4). Of course, I enter the best response, the Main Line (3… d5) and White opted to play the Classical Variation of the Main Line with (4. fxe5 Nxe4 5. Nf3).
Most of my knowledge and experience of the Main Line has largely been down the Paulsen Attack (5. Qf3), which is the most frequently played response, and probably the best response for White. Nonetheless, the Classical is “classical” for a reason – it’s perfectly good!
It was interesting reviewing Black’s options on analysis. There is a great logic in developing the king’s bishop as it immediately gives the option for kingside castling. With White potentially having an attack in the centre, getting the king to safety is good.
Stockfish evaluates that (5… Be7) or (5… Bc5) are the most accurate. Both have their merits and potential downsides. I very much liked Bc5 as there are then two attackers (with our advanced e4-knight) on White’s weak f2-square. Indeed, in the Vienna Game Main Line, White’s loss of the f-pawn creates a significant weakness along the dark f-square diagonal to their king! However, the problem with the immediate Bc5 is White has the obvious (6. d4), which hits the bishop with tempo and solidifies their advanced e5-pawn. Stockfish thinks this is fine, but I didn’t like it. With Be7, it’s a more conservative and subtle approach. It’s a good move, but it wasn’t something that I necessarily gravitated towards.
Interestingly, when we look at the Lichess community database and examine the win-loss ratios, Be7 and the confrontational Bb4 are the most winning, though we’re not talking about big differences.
As noted, I liked Bc5, but felt that it would have more juice with a second attacker of the d4 square. So, I developed my queen’s knight (5… Nc6). This was marginally less accurate [-0.2 → +0.1], but it’s a relatively forcing move! Now, you might be confused… to launch an attack, normally you need one more attacker than defenders. If Black has only two attackers on d4 and White has two defenders, why is it good for Black?
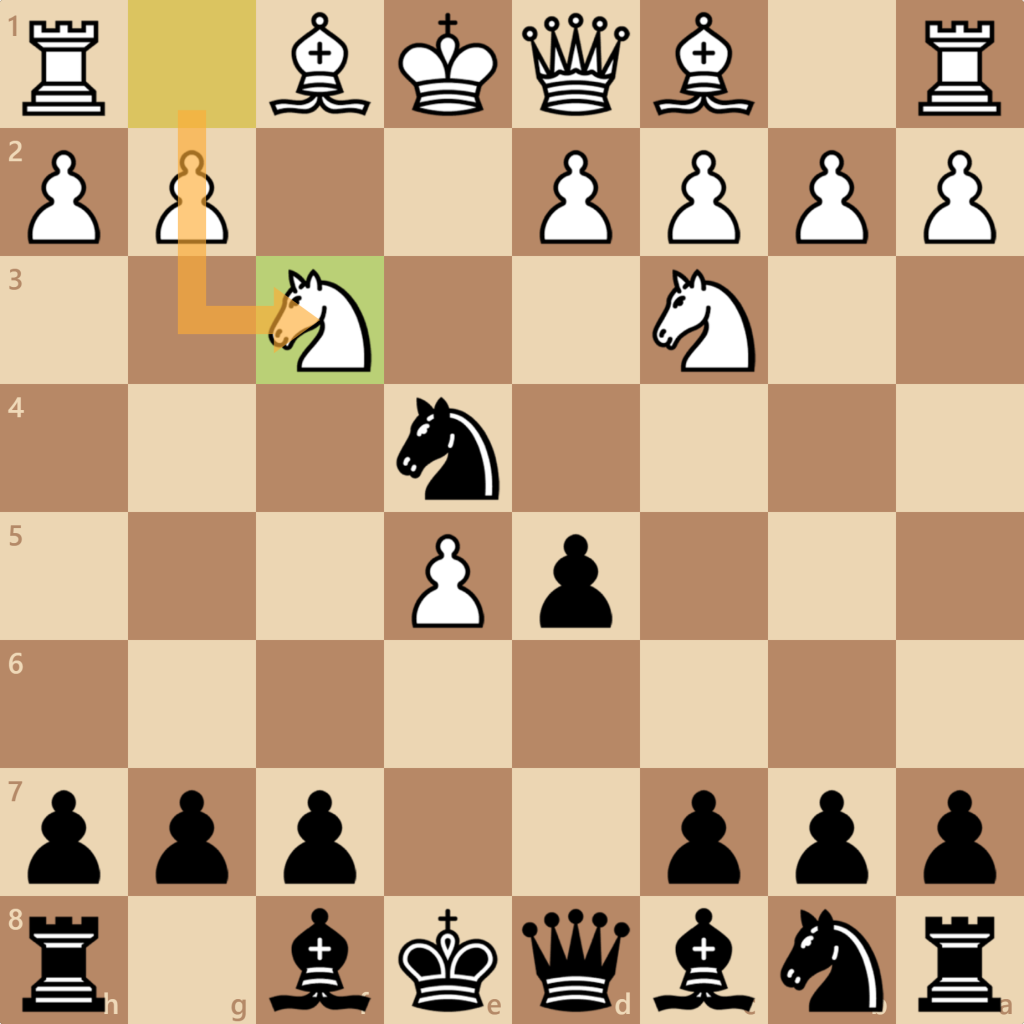
The reason is that White’s f3-knight is rather constrained! That weak dark square diagonal to the white king means that the knight MUST guard against Qh4+! This means that the f3-knight is only notionally defending the d4 square – something that can be exploited by Black! In the position after (5… Nc6), White has a single good move, which is to hobble Black’s knight with a pin (6. Bb5).
White doesn’t see this and plays (6. h3??), a blunder as Black now has (6… Bc5)! Black must play (7. d4) to block the attack on f2, but Black can capture that pawn with impunity (7… Nxd4). If White captures back, a very natural but blunderous move (8. Nxd4??), there is a beautiful, forced checkmate line [-M6] – (8… Qh4+ 9. g3 Qxg3+ 10. Ke2 Qf2+ 11. Kd3 Qxd4+ 12. Ke2 Ng3+ 13. Kf3 (or Ke1) Qf2#).
A historical note:
One of the earliest games of the Vienna Game: Main Line, 5. Nf3 Nc6 is (Mackenzie — Hollins, 1893, London, England) which contains this blunder by White, where they move their king’s knight, capturing in the centre on d4. It demonstrates the catastrophic impact with a delicious checkmate with a pawn on move 13!
Another beautiful and romantic game of the Vienna Game: Main Line, 5. Nf3 Nc6 is by Austrian chess master Leopold Löwy Jr. (1971-1940) in (NN — Loewy, 1905, Vienna, Austria) who makes use of brilliant sacrificial attacks for checkmate!
This opening can result in relatively positional games as well, and players including Blackburne and Lasker chose the (5… Nc6) variation.
In this game, I didn’t actually recognise that I could capture Black’s pawn on d4 and played (7… Bb4), losing most of my advantage… 😅 The Vienna Game Main Line can be tricky to play for both White and Black, and my misstep led to a central trade and on move 10 after (10 Qxe4), I knew that I had completely stuffed up! White had an obvious advantage – they held the centre, and I’d somehow lost both my central pawns! 😢
White’s approach should have been to solidify their space advantage with a push of pawns, but this isn’t necessarily an obvious idea at the beginner-intermediate level. By not doing this, I had a potential counterattack by attacking White’s developed queen in the centre of the board and winning some tempo to claw back some of the disadvantage (11… Bd5). White still had their weak kingside dark squares, and this was another avenue of counterattack (12… Bh4+).
The tactical logic? By poking at White’s weaknesses with aggressive threats, I was trying to provoke White to make a mistake. Next move, I gave their bishop a kick (13… a6?!). Stockfish called this an inaccuracy, but it worked! 🤩
Loss aversion is a cognitive bias that afflicts the best of us. The sensible response for White would have been to simplify and trade away their bishop (14. Bxc6+). Simple and clean. However, we hold notions that a “bishop is worth more than a knight” and that we don’t want to give away our bishop pair. In this position, White attempted to counterattack my bishop with (14. c4??). But this was a blunder as I could trade away that bishop with check, winning tempo (14… Bxf3+!) and White’s b5-bishop was still hanging! In essence, they blundered a piece.
One mistake sometimes creates the environment for another. After (15. Qxf3?! axb5), my knight was unpinned and threatening Nxd4+ a royal fork! White saw this and defended the position with (16. Be3). Here, I could win another pawn with (16… Nxd4+) which forces (17. Bxd4 Qxd4). Correct, safe, but perhaps a bit boring. 😏
So instead, I decided to play the deliciously romantic (😍), absolutely mad (🤪), and objectively blunderous (16… Qxd4!?) first! This move returns the evaluation to [0.00] but White must find the correct sequence by “sacrificing” their queen first (17. Qxc6+). Sacrifice is in quotation marks as at the end of the sequence, White takes my queen, and regains a piece, hence, the return to equality. I’d already established that my opponent suffered from a loss aversion bias.
Without a doubt, White would see that the obvious (17. Bxd4) results in an unfavourable trade due to the resulting royal fork (17… Nxd4+). However, by avoiding capturing my queen (which is the second-best move!), I’m once again provoking and inviting them to blunder – and they did (17. cxb5??) [-M7]. After (17… Qxb2+), White was facing losing one or both rooks. To avoid stepping their king onto the back rank, they blocked the check with (18. Bd2), but of course (18… Nd4+) royal fork! Emotional damage, good game, GG!
The big takeaway from this game is being sensitised to tactics that could be used in the early Vienna Game Main Line when playing with the Black pieces, especially exploiting White’s weak dark squares to the king, and the illusory control that their king’s knight has of the d4 square.
Game: https://www.chess.com/game/live/112501856437
[Event "Live Chess"]
[Site "Chess.com"]
[Date "2024.06.18"]
[Round "?"]
[White "JanmajayS"]
[Black "vitualis"]
[Result "0-1"]
[ECO "C29"]
[WhiteElo "1189"]
[BlackElo "1289"]
[TimeControl "900+10"]
[EndTime "19:22:45 PDT"]
[Termination "vitualis won by resignation"]
[BlackUrl "https://images.chesscomfiles.com/uploads/v1/user/3711094.f52a0759.50x50o.ab18600a8723.png"]
[BlackCountry "17"]
[BlackTitle ""]
[WhiteUrl "https://images.chesscomfiles.com/uploads/v1/user/85786896.7f7ae73c.50x50o.bc86e8f0b56a.jpg"]
[WhiteCountry "100"]
[WhiteTitle ""]

1. e4 {[%clk 0:15:10][%timestamp 1]} 1... e5 {[%clk 0:15:08.7][%timestamp 13]}
2. Nc3 {[%clk 0:15:18.8][%timestamp 12]} 2... Nf6 {[%clk 0:15:13.3][%timestamp
54]} 3. f4 {[%clk 0:15:25.3][%timestamp 35]} 3... d5 {[%clk
0:15:22.4][%timestamp 9] Vienna Game: Main Line $1 [-0.3]} 4. fxe5 {[%clk
0:15:29.1][%timestamp 62]} 4... Nxe4 {[%clk 0:15:31.8][%timestamp 6]} 5. Nf3
{[%clk 0:15:37.5][%timestamp 16] \"Classical Variation\" of the Main Line $1
[-0.2]. Now, I actually don't have a good approach to this, other than play
solidly $1 Most of my knowledge has been against the Paulsen Attack where White
plays (5. Qf3).} 5... Nc6 {[%clk 0:15:20][%timestamp 218][%c_arrow
f8e7;keyPressed;none;from;f8;opacity;0.8;to;e7;persistent;false,e7c5;keyPressed;none;from;e7;opacity;0.8;to;c5;persistent;false,c5b4;keyPressed;none;from;c5;opacity;0.8;to;b4;persistent;false][%c_highlight
c5;keyPressed;shift;opacity;0.8;square;c5;persistent;false,e7;keyPressed;shift;opacity;0.8;square;e7;persistent;false,b4;keyPressed;shift;opacity;0.8;square;b4;persistent;false]
Stockfish thinks that Be7 or Bc5 is a more accurate way to play. The Lichess
community database suggest that Be7 or Bb4 have the best win ratio for Black.
However, Nc6 is just about the same in terms of accuracy and win ratio. [+0.1]
Potentially, this is a forcing move...} 6. h3 $4 {[%clk 0:15:40.6][%timestamp
69][%c_effect h3;square;h3;type;Blunder;persistent;true][%c_highlight
h3;keyPressed;none;opacity;0.8;square;h3;persistent;false,b5;keyPressed;none;opacity;0.8;square;b5;persistent;false][%c_arrow
f1b5;keyPressed;none;from;f1;opacity;0.8;to;b5;persistent;false] This is a
blunder [-3] and White has only a SINGLE good move, which is (6. Bb5).} 6... Bc5
{[%clk 0:15:12.7][%timestamp 173] Because now, White has a problem with the
f2-square $1 Note, the early f-pawn move with the Vienna Gambit creates a dark
square weakness to the White king in the Main Line $1} 7. d4 {[%clk
0:15:38.1][%timestamp 125]} 7... Bb4 $2 {[%clk 0:15:06.3][%timestamp
164][%c_effect b4;square;b4;type;Mistake;persistent;true][%c_arrow
c6d4;keyPressed;none;from;c6;opacity;0.8;to;d4;persistent;false][%c_highlight
d4;keyPressed;none;opacity;0.8;square;d4;persistent;false] However, here, I
didn't recognise the tactic $1 [-1.3] White's f3-knight is largely stuck as it
needs to guard the h4 square against Black's Qh4+, which can be a devastating
attack $1} (7... Nxd4 {This is the move that I needed play $1 If White carelessly
captures the knight with Nxd4, it's forced checkmate $1} 8. Nxd4 $4 {[%c_effect
d4;square;d4;type;Blunder;persistent;true][%c_highlight
d4;keyPressed;none;opacity;0.8;square;d4;persistent;false]} (8. Nxe4 {White is
basically forced into this line to limit the damage...} 8... dxe4 9. Nxd4 Qxd4
10. Qxd4 Bxd4 {And chess continues with Black having a substantial
advantage...}) 8... Qh4+ {[%c_arrow
h4e1;keyPressed;none;from;h4;opacity;0.8;to;e1;persistent;false,e4d2;keyPressed;none;from;e4;opacity;0.8;to;d2;persistent;false][%c_highlight
e1;keyPressed;none;opacity;0.8;square;e1;persistent;false,f2;keyPressed;none;opacity;0.8;square;f2;persistent;false,d2;keyPressed;none;opacity;0.8;square;d2;persistent;false]}
9. g3 {[%c_arrow
e4d2;keyPressed;none;from;e4;opacity;0.8;to;d2;persistent;false,e4f2;keyPressed;none;from;e4;opacity;0.8;to;f2;persistent;false][%c_highlight
d2;keyPressed;none;opacity;0.8;square;d2;persistent;false,f2;keyPressed;none;opacity;0.8;square;f2;persistent;false]}
9... Qxg3+ {[%c_arrow
g3e1;keyPressed;none;from;g3;opacity;0.8;to;e1;persistent;false,e4d2;keyPressed;none;from;e4;opacity;0.8;to;d2;persistent;false][%c_highlight
e1;keyPressed;none;opacity;0.8;square;e1;persistent;false,d2;keyPressed;none;opacity;0.8;square;d2;persistent;false,f2;keyPressed;none;opacity;0.8;square;f2;persistent;false]}
10. Ke2 {[%c_arrow
g3e1;keyPressed;none;from;g3;opacity;0.8;to;e1;persistent;false,e4d2;keyPressed;none;from;e4;opacity;0.8;to;d2;persistent;false,g3d3;keyPressed;none;from;g3;opacity;0.8;to;d3;persistent;false][%c_highlight
e1;keyPressed;none;opacity;0.8;square;e1;persistent;false,f2;keyPressed;none;opacity;0.8;square;f2;persistent;false,d2;keyPressed;none;opacity;0.8;square;d2;persistent;false,f3;keyPressed;none;opacity;0.8;square;f3;persistent;false,e3;keyPressed;none;opacity;0.8;square;e3;persistent;false,d3;keyPressed;none;opacity;0.8;square;d3;persistent;false]}
10... Qf2+ {[%c_arrow
f2d2;keyPressed;none;from;f2;opacity;0.8;to;d2;persistent;false,f2e1;keyPressed;none;from;f2;opacity;0.8;to;e1;persistent;false,f2e3;keyPressed;none;from;f2;opacity;0.8;to;e3;persistent;false,f2f3;keyPressed;none;from;f2;opacity;0.8;to;f3;persistent;false,e4f2;keyPressed;none;from;e4;opacity;0.8;to;f2;persistent;false][%c_highlight
e2;keyPressed;none;opacity;0.8;square;e2;persistent;false,d2;keyPressed;none;opacity;0.8;square;d2;persistent;false,e1;keyPressed;none;opacity;0.8;square;e1;persistent;false,e3;keyPressed;none;opacity;0.8;square;e3;persistent;false,f3;keyPressed;none;opacity;0.8;square;f3;persistent;false,f2;keyPressed;none;opacity;0.8;square;f2;persistent;false]}
11. Kd3 {[%c_arrow
d5e4;keyPressed;none;from;d5;opacity;0.8;to;e4;persistent;false,f2d2;keyPressed;none;from;f2;opacity;0.8;to;d2;persistent;false,f2e3;keyPressed;none;from;f2;opacity;0.8;to;e3;persistent;false][%c_highlight
e4;keyPressed;none;opacity;0.8;square;e4;persistent;false,d2;keyPressed;none;opacity;0.8;square;d2;persistent;false,e2;keyPressed;none;opacity;0.8;square;e2;persistent;false,e3;keyPressed;none;opacity;0.8;square;e3;persistent;false]}
11... Qxd4+ {[%c_arrow
c5d4;keyPressed;none;from;c5;opacity;0.8;to;d4;persistent;false,d4e4;keyPressed;none;from;d4;opacity;0.8;to;e4;persistent;false,d4e3;keyPressed;none;from;d4;opacity;0.8;to;e3;persistent;false,d4d2;keyPressed;none;from;d4;opacity;0.8;to;d2;persistent;false,d4c4;keyPressed;none;from;d4;opacity;0.8;to;c4;persistent;false][%c_highlight
d4;keyPressed;none;opacity;0.8;square;d4;persistent;false,e4;keyPressed;none;opacity;0.8;square;e4;persistent;false,e3;keyPressed;none;opacity;0.8;square;e3;persistent;false,d2;keyPressed;none;opacity;0.8;square;d2;persistent;false,d3;keyPressed;none;opacity;0.8;square;d3;persistent;false,c4;keyPressed;none;opacity;0.8;square;c4;persistent;false]}
12. Ke2 {[%c_arrow
d4d2;keyPressed;none;from;d4;opacity;0.8;to;d2;persistent;false,d4f2;keyPressed;none;from;d4;opacity;0.8;to;f2;persistent;false][%c_highlight
d3;keyPressed;none;opacity;0.8;square;d3;persistent;false,d2;keyPressed;none;opacity;0.8;square;d2;persistent;false,e3;keyPressed;none;opacity;0.8;square;e3;persistent;false,f2;keyPressed;none;opacity;0.8;square;f2;persistent;false]}
12... Ng3+ {[%c_arrow
d4d2;keyPressed;none;from;d4;opacity;0.8;to;d2;persistent;false,d4f2;keyPressed;none;from;d4;opacity;0.8;to;f2;persistent;false,g3e2;keyPressed;none;from;g3;opacity;0.8;to;e2;persistent;false][%c_highlight
d2;keyPressed;none;opacity;0.8;square;d2;persistent;false,d3;keyPressed;none;opacity;0.8;square;d3;persistent;false,f2;keyPressed;none;opacity;0.8;square;f2;persistent;false,e3;keyPressed;none;opacity;0.8;square;e3;persistent;false,e2;keyPressed;none;opacity;0.8;square;e2;persistent;false]}
13. Kf3 {[%c_arrow
d4f2;keyPressed;none;from;d4;opacity;0.8;to;f2;persistent;false,g3e2;keyPressed;none;from;g3;opacity;0.8;to;e2;persistent;false,g3e4;keyPressed;none;from;g3;opacity;0.8;to;e4;persistent;false,c8g4;keyPressed;none;from;c8;opacity;0.8;to;g4;persistent;false][%c_highlight
e3;keyPressed;none;opacity;0.8;square;e3;persistent;false,f2;keyPressed;none;opacity;0.8;square;f2;persistent;false,e2;keyPressed;none;opacity;0.8;square;e2;persistent;false,e4;keyPressed;none;opacity;0.8;square;e4;persistent;false,g4;keyPressed;none;opacity;0.8;square;g4;persistent;false]}
13... Qf2# {[%c_arrow
c5f2;keyPressed;none;from;c5;opacity;0.8;to;f2;persistent;false,f2g2;keyPressed;none;from;f2;opacity;0.8;to;g2;persistent;false,f2e2;keyPressed;none;from;f2;opacity;0.8;to;e2;persistent;false,f2e3;keyPressed;none;from;f2;opacity;0.8;to;e3;persistent;false,g3e4;keyPressed;none;from;g3;opacity;0.8;to;e4;persistent;false,f2g3;keyPressed;none;from;f2;opacity;0.8;to;g3;persistent;false,f2f4;keyPressed;none;from;f2;opacity;0.8;to;f4;persistent;false,c8g4;keyPressed;none;from;c8;opacity;0.8;to;g4;persistent;false][%c_highlight
f2;keyPressed;none;opacity;0.8;square;f2;persistent;false,g2;keyPressed;none;opacity;0.8;square;g2;persistent;false,e2;keyPressed;none;opacity;0.8;square;e2;persistent;false,e3;keyPressed;none;opacity;0.8;square;e3;persistent;false,e4;keyPressed;none;opacity;0.8;square;e4;persistent;false,g3;keyPressed;none;opacity;0.8;square;g3;persistent;false,f4;keyPressed;none;opacity;0.8;square;f4;persistent;false,f3;keyPressed;none;opacity;0.8;square;f3;persistent;false,g4;keyPressed;none;opacity;0.8;square;g4;persistent;false]})
8. Qd3 $6 {[%clk 0:15:06.1][%timestamp 420][%c_arrow
a2a3;keyPressed;none;from;a2;opacity;0.8;to;a3;persistent;false][%c_highlight
a3;keyPressed;none;opacity;0.8;square;a3;persistent;false][%c_effect
d3;square;d3;type;Inaccuracy;persistent;true] This is an inaccuracy [-2].
White's best approach is (8. a3), which would force Black to trade their bishop
for the knight (8... Bxc3+ 9. bxc3). Although White has doubled c-pawns, this
supports a strong central pawn cluster. This structure is often \"fine\" for
White in the Vienna Game Main Line.} 8... Be7 $2 {[%clk 0:13:52.4][%timestamp
839][%c_arrow
c8f5;keyPressed;none;from;c8;opacity;0.8;to;f5;persistent;false][%c_highlight
f5;keyPressed;none;opacity;0.8;square;f5;persistent;false][%c_effect
e7;square;e7;type;Mistake;persistent;true] Here, I had a tricky tactic in mind -
Bh4+ and then after Nxh4, I would attack with my queen, Qxh4+ $1 However, this
backwards bishop move is a mistake [+1.3] as I lose tempo, and White can refute
the attack easily with some simplification... My e4-knight is attacked twice but
defended only once. The best move is (8... Bf5) to defend the central knight.}
9. Nxe4 {[%clk 0:14:59.7][%timestamp 164]} 9... dxe4 $2 {[%clk
0:13:59.1][%timestamp 33][%c_effect
e4;square;e4;type;Mistake;persistent;true][%c_arrow
c6b4;keyPressed;none;from;c6;opacity;0.8;to;b4;persistent;false][%c_highlight
b4;keyPressed;none;opacity;0.8;square;b4;persistent;false] Stockfish can see a
somewhat complicated manoeuvre that limits the damage with Nb4 first. However,
this is difficult and tricky to see. The idea is that the knight gains tempo and
advances [+2.6].} 10. Qxe4 {[%clk 0:15:08.8][%timestamp 9] Here, I knew that I'd
stuffed up and White has captured the advantage in the opening $1} 10... Be6
{[%clk 0:13:17.4][%timestamp 517]} 11. Bb5 $6 {[%clk 0:14:59.7][%timestamp
191][%c_effect b5;square;b5;type;Inaccuracy;persistent;true][%c_arrow
c2c4;keyPressed;none;from;c2;opacity;0.8;to;c4;persistent;false][%c_highlight
c4;keyPressed;none;opacity;0.8;square;c4;persistent;false] This move makes
sense, developing the bishop and preparing for short castling, but it's
inaccurate. White had the opportunity for c4 and taking space $1 [+1.6]} 11... Bd5
{[%clk 0:13:22.8][%timestamp 46] Winning tempo on White's queen $1} 12. Qd3 $2
{[%clk 0:14:53.9][%timestamp 158][%c_effect
d3;square;d3;type;Mistake;persistent;true][%c_arrow
e4g4;keyPressed;none;from;e4;opacity;0.8;to;g4;persistent;false][%c_highlight
g4;keyPressed;none;opacity;0.8;square;g4;persistent;false] However, this
somewhat hesitant move was a mistake $1 [+1] White's king is still very exposed
along the dark squares $1} 12... Bh4+ {[%clk 0:13:03.4][%timestamp 294]} 13. Ke2
{[%clk 0:14:51.4][%timestamp 125] However, they see it $1 Nxh4 would have been a
mistake.} 13... a6 $6 {[%clk 0:12:32.6][%timestamp 408][%c_effect
a6;square;a6;type;Inaccuracy;persistent;true][%c_arrow
e8g8;keyPressed;none;from;e8;opacity;0.8;to;g8;persistent;false][%c_highlight
g8;keyPressed;none;opacity;0.8;square;g8;persistent;false] I wanted to keep up
the momentum so played a6. Stockfish thinks that castling the king out of the
centre was best. [+1.8]} 14. c4 $4 {[%clk 0:14:15.2][%timestamp 462][%c_effect
c4;square;c4;type;Blunder;persistent;true][%c_highlight
c4;keyPressed;none;opacity;0.8;square;c4;persistent;false] Yes $3 My move
provoked White to make a game changing blunder $1 [-4.8] White at least loses
their bishop as I can trade my light square bishop for White's knight with
check, winning tempo $1} 14... Bxf3+ $1 {[%clk 0:12:11.6][%timestamp 310][%c_effect
f3;square;f3;type;GreatFind;persistent;true][%c_highlight
f3;keyPressed;alt;opacity;0.8;square;f3;persistent;false]} 15. Qxf3 $6 {[%clk
0:14:12.9][%timestamp 123][%c_arrow
g2f3;keyPressed;none;from;g2;opacity;0.8;to;f3;persistent;false][%c_effect
f3;square;f3;type;Inaccuracy;persistent;true][%c_highlight
f3;keyPressed;none;opacity;0.8;square;f3;persistent;false] White should have
probably taken with their g-pawn, but the move makes some heuristic sense. White
probably didn't want an isolated h-pawn, and likely saw that they brought a
second attacker on Black's c6-knight. However...} 15... axb5 {[%clk
0:12:20.9][%timestamp 7] ... that bishop was dead either way. And note that with
the knight unpinned, a royal fork with Nxd4+ is looming $1} 16. Be3 {[%clk
0:14:09.4][%timestamp 135] White did see it, and defended against it..} 16...
Qxd4 $5 {[%clk 0:12:19.8][%timestamp 111][%c_effect
d4;square;d4;type;Interesting;persistent;true][%c_arrow
c6d4;keyPressed;none;from;c6;opacity;0.8;to;d4;persistent;false][%c_highlight
d4;keyPressed;none;opacity;0.8;square;d4;persistent;false] And here, I decided
to play a very tricky move $1 This move is arguably a blunder that returns the
game back to equality [0.00]. However, White has to find (17. Qxc6+) as after
(17... bxc6 18. Bxd4), White wins back a piece. The correct, safe, and perhaps
slightly boring move was (16... Nxd4+), a royal fork which forces (17. Bxd4
Qxd4), trading down material.} 17. cxb5 $4 {[%clk 0:14:06.4][%timestamp
130][%c_effect b5;square;b5;type;Blunder;persistent;true][%c_highlight
b5;keyPressed;none;opacity;0.8;square;b5;persistent;false] White fails to find
the move $1 Again, the attack provoked White to make a catastrophic blunder
[-M7] $1} 17... Qxb2+ {[%clk 0:12:03.9][%timestamp 259]} 18. Bd2 {[%clk
0:14:05.3][%timestamp 111] White wanted to avoid stepping onto the back rank and
losing their rook with an absolute fork, but this move removes the defender of
the d4 square...} 18... Nd4+ {[%clk 0:12:08][%timestamp 59][%c_effect
e8;square;e8;type;Winner,e2;square;e2;type;ResignWhite][%c_arrow
d4e2;keyPressed;none;from;d4;opacity;0.8;to;e2;persistent;false,d4f3;keyPressed;none;from;d4;opacity;0.8;to;f3;persistent;false][%c_highlight
e2;keyPressed;none;opacity;0.8;square;e2;persistent;false,f3;keyPressed;none;opacity;0.8;square;f3;persistent;false]
Emotional damage, good game, GG $1} 0-1
