
Welcome to another Quick Wins and today, we have a double brilliancy in one of my favourite lines in the Vienna Game, the Giraffe Attack!! 🦒🤪👍‼️‼️
It had been some time since I last played down this line, and I was great reminding myself of its giraffey goodness. For those who aren’t familiar, I’ve a playlist on my YouTube channel with over 20 videos!

I also wrote the “Complete Guide to the Giraffe Attack in the Vienna Game!🦒♟️” a year-and-a-half ago if you want a detailed primer on the opening!

* * *
Firstly, the Giraffe Attack is a somewhat unsound, but very effective move that immediately undermines the Anderssen Defense (2… Bc5) to the Vienna Game. This flexible response to the Vienna was played by and named after Adolf Anderssen (1818-1879). Anderssen was an immensely strong chess player, and was considered the world’s best active player from 1851 (after winning the first international chess tournament in London) until 1866, where he lost to the ascendant and future first World Chess Champion, Wilhelm Steinitz (1836-1990). Anderssen did lose decisively to Morphy in 1858 during his tour of Europe, but Morphy essentially retired from chess soon after on his return to the US.
Download all of Anderssen’s games (PGN)
where he played the Anderssen Defense! 🤩👍
I find it fascinating to discover the tactical insights of chess masters from ages past, in light of modern data. When we look at the Lichess community database, the Anderssen Defense is empirically the best response by Black in terms of win-loss likelihood, even if it isn’t the most accurate.
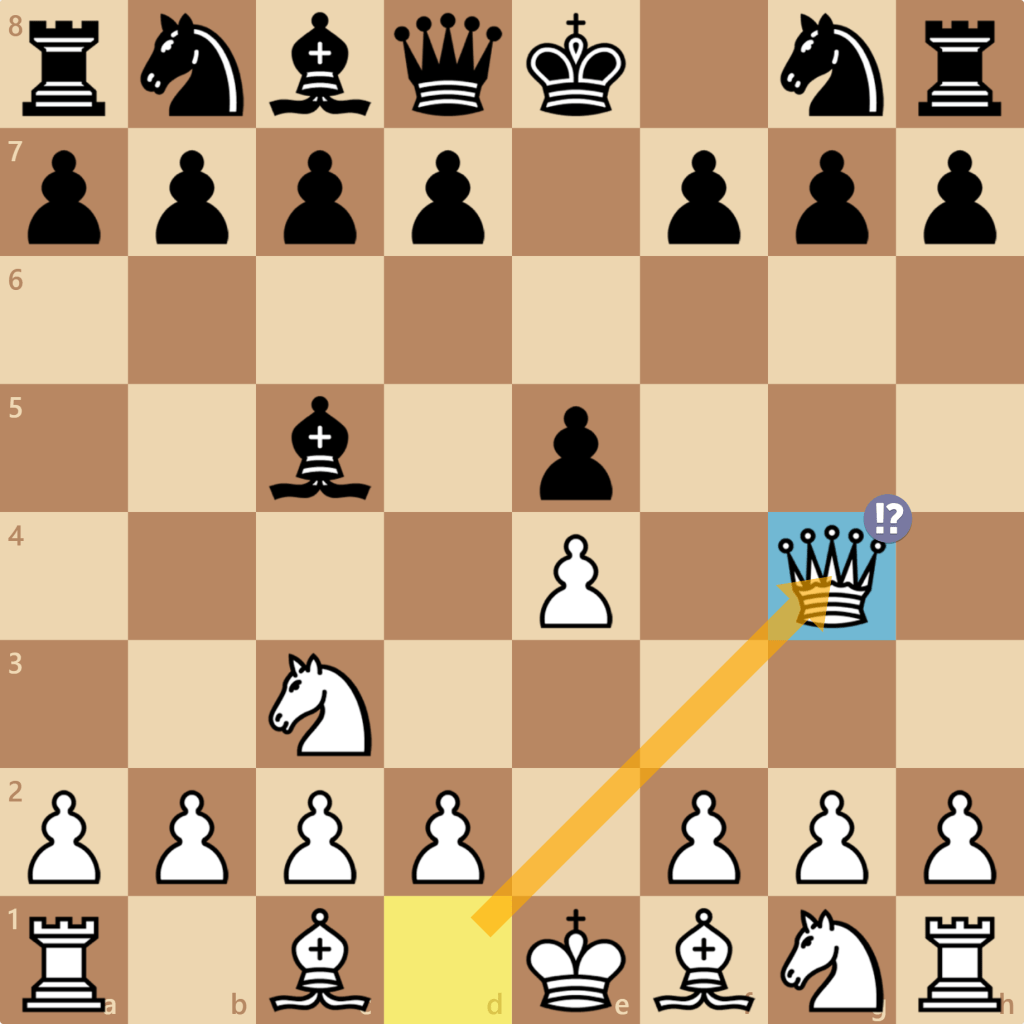
However, White can turn things around with one of two relatively inaccurate moves of their own; the Vienna Gambit like (3. f4), or the featured line of this article, the fabulous Giraffe Attack (3. Qg4!?). The advantage of the Giraffe Attack is that it is almost never seen (less than 1% of responses to the Anderssen Defense), it is one of the most winning responses (White wins 53% vs Black wins 44%), with there being some simple attacking ideas for White.
The premise is that the queen on g4 immediately pressures Black’s hanging g7-pawn, punishing Black’s early movement of their dark square bishop. In this game, Black played the second most common response to address the g-pawn problem by pushing it forward (3… g6?!). This makes sense in a very direct way, but it’s a strategic mistake. Notice that Black has created dark square weaknesses on their kingside!
With White, we can immediately exploit this with (4. Qg3), threatening Qxe5+ which is a triple fork! Black defended their e-pawn with (4… d6); logical. However, the thing to know is that the weakness remains, and the attack is so strong, we can afford sacrificing a knight. And so, (5. Nf3) with the intention of Nxe5!
Black decided to play a bold move (5… f5?!) and sought to double down and take space on the kingside. However, this doesn’t address the dark square weaknesses and so the first brilliancy (6. Nxe5!!). Black realised that they couldn’t safely capture the knight back with (dxe5) and so played another logical move (6… Qe7?) to add a second attacker. However, this compounds the mistake as we have another brilliant move (7. Nxd5!!) – this pressures Black’s queen on e7 and the c7-pawn!
This forces a queen trade (7… Qxe5 8. Qxe5 dxe5) and then the winning strike (9. Nxc7+! Kd8 10. Nxa8), and I emerge from the opening salvo having won Black’s rook! Technically, this is a rook-knight trade, as the knight on a8 is relatively trapped and Black could capture it if they are careful. On the other hand, the approach for White is now quite simple: consolidate, develop, castle the king to safety, and if Black permits it, attempt to rescue the knight, but to not prioritise this.
In this game, Black opted to delay developing their queenside pieces aiming instead for an attempt for an attack. However, this approach was premature, wasn’t difficult to deflect, and left them susceptible to a counterattack on their king in the centre files. On turn 16, Black played (16… Ke6), and in doing so, abandoned the defence of the c7 square. My knight, chillaxing on a8, leapt at the opportunity with (17. Nc7+!?). This wasn’t the most accurate move, but it struck with a psychological blow – the knight had escaped its detention! Black lost the will to play on and resigned, defeated. Good game, GG!
* * *
Learn how to play the best chess opening attacks in the Romantic style with my new book, “Become a Chess Assassin!”.

* * *
[Event "Live Chess"]
[Site "Chess.com"]
[Date "2025.05.29"]
[Round "-"]
[White "vitualis"]
[Black "volpone84"]
[Result "1-0"]
[CurrentPosition "1nb2r2/ppN4p/2n1k1p1/1Bb1p1B1/8/8/PPP2PPP/R4RK1 b - - 8 17"]
[Timezone "UTC"]
[ECO "C25"]
[ECOUrl "https://www.chess.com/openings/Vienna-Game-Anderssen-Defense-Giraffe-Attack"]
[UTCDate "2025.05.29"]
[UTCTime "05:19:58"]
[WhiteElo "1085"]
[BlackElo "991"]
[TimeControl "300+5"]
[Termination "vitualis won by resignation"]
[StartTime "05:19:58"]
[EndDate "2025.05.29"]
[EndTime "05:24:41"]
[WhiteUrl "https://images.chesscomfiles.com/uploads/v1/user/3711094.db4cf652.50x50o.4dec0e446096.png"]
[WhiteCountry "17"]
[WhiteTitle ""]
[BlackUrl "https://www.chess.com/bundles/web/images/noavatar_l.84a92436.gif"]
[BlackCountry "76"]
[BlackTitle ""]
[Link "https://www.chess.com/analysis/game/pgn/5cDDHk9iV4?tab=analysis&move=32"]

1. e4 {[%clk 0:05:04.7][%timestamp 3]} 1... e5 {[%clk 0:05:03.7][%timestamp 13]}
2. Nc3 {[%clk 0:05:08.3][%timestamp 14]} 2... Bc5 {[%clk 0:05:07.1][%timestamp
16] Vienna Game: Anderssen Defense} 3. Qg4 $5 {[%clk 0:05:11.4][%timestamp
19][%c_effect g4;square;g4;type;Interesting;persistent;true][%c_arrow
g1f3;keyPressed;none;from;g1;opacity;0.8;to;f3;persistent;false,g4h5;keyPressed;none;from;g4;opacity;0.8;to;h5;persistent;false,f1c4;keyPressed;none;from;f1;opacity;0.8;to;c4;persistent;false,f2f4;keyPressed;none;from;f2;opacity;0.8;to;f4;persistent;false][%c_highlight
f3;keyPressed;shift;opacity;0.8;square;f3;persistent;false,h5;keyPressed;shift;opacity;0.8;square;h5;persistent;false,c4;keyPressed;shift;opacity;0.8;square;c4;persistent;false,f4;keyPressed;shift;opacity;0.8;square;f4;persistent;false]
And we respond with one of my favourite and most winning lines in the Vienna,
the GIRAFFE ATTACK $1 🦒🤪👍 The most accurate moves in the position are Nf3, Qh5,
and Bc4; the most winning moves are f4 and Qg4 $1} 3... g6 $6 {[%clk
0:05:03.4][%timestamp 87][%c_effect
g6;square;g6;type;Inaccuracy;persistent;true][%c_arrow
g8f6;keyPressed;none;from;g8;opacity;0.8;to;f6;persistent;false][%c_highlight
f6;keyPressed;none;opacity;0.8;square;f6;persistent;false] This makes sense but
is arguably a strategic mistake. Note that Black has substantially weakened the
dark squares on the king side $1} 4. Qg3 {[%clk 0:05:14.8][%timestamp 16][%c_arrow
g3e5;keyPressed;none;from;g3;opacity;0.8;to;e5;persistent;false,e5h8;keyPressed;none;from;e5;opacity;0.8;to;h8;persistent;false,e5e8;keyPressed;none;from;e5;opacity;0.8;to;e8;persistent;false,e5c5;keyPressed;none;from;e5;opacity;0.8;to;c5;persistent;false][%c_highlight
e5;keyPressed;none;opacity;0.8;square;e5;persistent;false] The tactic: we
immediately try to exploit those weak dark squares $1} 4... d6 {[%clk
0:05:04.5][%timestamp 39]} 5. Nf3 {[%clk 0:05:15.6][%timestamp 42][%c_arrow
g3e5;keyPressed;none;from;g3;opacity;0.8;to;e5;persistent;false,f3e5;keyPressed;none;from;f3;opacity;0.8;to;e5;persistent;false,c3a4;keyPressed;none;from;c3;opacity;0.8;to;a4;persistent;false][%c_highlight
e5;keyPressed;none;opacity;0.8;square;e5;persistent;false,a4;keyPressed;shift;opacity;0.8;square;a4;persistent;false]
A natural developing move and our goal is to pressure the e-pawn. The thing to
know is that this is so strong, we can sacrifice the knight $1 Stockfish prefers
the more pedestrian Na4, which then essentially forces a trade of the knight for
Black's dark square bishop, damaging their pawn structure.} 5... f5 $6 {[%clk
0:05:05.5][%timestamp 40][%c_arrow
g8f6;keyPressed;none;from;g8;opacity;0.8;to;f6;persistent;false][%c_highlight
f6;keyPressed;none;opacity;0.8;square;f6;persistent;false][%c_effect
f5;square;f5;type;Inaccuracy;persistent;true] A rather bold approach - not
accurate, but Black is making an ambit claim to capture space} 6. Nxe5 $3 {[%clk
0:05:09.3][%timestamp 113][%c_effect
e5;square;e5;type;Brilliant;persistent;true][%c_highlight
e5;keyPressed;alt;opacity;0.8;square;e5;persistent;false] But we capture the
e-pawn anyway, ostensibly as a sacrifice $1 However, Black can't safely capture
with dxe5 as Qxe5+ is a triple absolute fork $1} 6... Qe7 $2 {[%clk
0:04:50.6][%timestamp 199][%c_effect e7;square;e7;type;Mistake;persistent;true]
There is a good logic here, putting a second attacker on the knight, except...}
7. Nd5 $3 {[%clk 0:04:41.7][%timestamp 326][%c_effect
d5;square;d5;type;Brilliant;persistent;true][%c_highlight
d5;keyPressed;alt;opacity;0.8;square;d5;persistent;false,e7;keyPressed;none;opacity;0.8;square;e7;persistent;false,c7;keyPressed;none;opacity;0.8;square;c7;persistent;false][%c_arrow
d5e7;keyPressed;none;from;d5;opacity;0.8;to;e7;persistent;false,d5c7;keyPressed;none;from;d5;opacity;0.8;to;c7;persistent;false]
We have the very thematic queen's knight to d5, hitting Black's queen and the
c7-pawn $1 Black cannot avoid losing material now and a queen trade is \"forced\",
insofar that it's Black's best option.} 7... Qxe5 {[%clk 0:04:49][%timestamp
66]} 8. Qxe5+ {[%clk 0:04:43.9][%timestamp 28]} 8... dxe5 {[%clk
0:04:51.6][%timestamp 24]} 9. Nxc7+ $1 {[%clk 0:04:48][%timestamp 9][%c_effect
c7;square;c7;type;GreatFind;persistent;true][%c_highlight
c7;keyPressed;alt;opacity;0.8;square;c7;persistent;false,e8;keyPressed;none;opacity;0.8;square;e8;persistent;false,a8;keyPressed;none;opacity;0.8;square;a8;persistent;false][%c_arrow
c7e8;keyPressed;none;from;c7;opacity;0.8;to;e8;persistent;false,c7a8;keyPressed;none;from;c7;opacity;0.8;to;a8;persistent;false]}
9... Kd8 {[%clk 0:04:53.2][%timestamp 34]} 10. Nxa8 {[%clk 0:04:48.6][%timestamp
44] Stockfish didn't consider this consolidation the most accurate, but it's
simple and clean $1 The approach now is the consolidate, and if permitted, to
evacuate the knight in the corner. If Black permits this, then the game is
completely won.} 10... fxe4 {[%clk 0:04:54.2][%timestamp 40]} 11. Bc4 $6 {[%clk
0:04:35.2][%timestamp 184][%c_effect
c4;square;c4;type;Inaccuracy;persistent;true][%c_arrow
d2d3;keyPressed;none;from;d2;opacity;0.8;to;d3;persistent;false][%c_highlight
d3;keyPressed;none;opacity;0.8;square;d3;persistent;false] d3 would have been
more accurate, but I wanted to develop my bishop} 11... Ne7 {[%clk
0:04:45.8][%timestamp 134]} 12. d3 {[%clk 0:04:37.6][%timestamp 26]} 12... exd3
{[%clk 0:04:41.3][%timestamp 95]} 13. Bxd3 {[%clk 0:04:40.5][%timestamp 21]}
13... Rf8 $6 {[%clk 0:04:09.3][%timestamp 370][%c_effect
f8;square;f8;type;Inaccuracy;persistent;true][%c_arrow
c5f2;keyPressed;none;from;c5;opacity;0.8;to;f2;persistent;false,f8f2;keyPressed;none;from;f8;opacity;0.8;to;f2;persistent;false,c8e6;keyPressed;none;from;c8;opacity;0.8;to;e6;persistent;false][%c_highlight
e6;keyPressed;none;opacity;0.8;square;e6;persistent;false] This made sense, but
the attack was premature. Developing the queenside pieces and potentially
capturing the a8-knight is probably the best approach.} 14. O-O {[%clk
0:04:29.1][%timestamp 164]} 14... Nec6 $6 {[%clk 0:04:08][%timestamp
63][%c_effect c6;square;c6;type;Inaccuracy;persistent;true][%c_arrow
c8f5;keyPressed;none;from;c8;opacity;0.8;to;f5;persistent;false][%c_highlight
f5;keyPressed;none;opacity;0.8;square;f5;persistent;false] Again, developing the
queenside pieces is better} 15. Bg5+ {[%clk 0:04:31.6][%timestamp 25]} 15...
Kd7 $6 {[%clk 0:04:06.4][%timestamp 66][%c_effect
d7;square;d7;type;Inaccuracy;persistent;true][%c_arrow
c5e7;keyPressed;none;from;c5;opacity;0.8;to;e7;persistent;false][%c_highlight
e7;keyPressed;none;opacity;0.8;square;e7;persistent;false] Black is in a
difficult situation. Apparently, accepting the bishop exchange was the most
accurate option, but this doesn't fit with the usual approach to avoid trading
pieces when down on material.} 16. Bb5 {[%clk 0:04:22.9][%timestamp 137]} 16...
Ke6 {[%clk 0:03:51.7][%timestamp 197] And with this move, Black gave up the
defence of the c7 square...} 17. Nc7+ $5 {[%clk 0:04:25.5][%timestamp
24][%c_effect
g1;square;g1;type;Winner;animated;true,e6;square;e6;type;ResignBlack;animated;true,c7;square;c7;type;Interesting;persistent;true][%c_arrow
c7e6;keyPressed;none;from;c7;opacity;0.8;to;e6;persistent;false][%c_highlight
e6;keyPressed;none;opacity;0.8;square;e6;persistent;false] ... allowing the
knight to be evacuated $1 The engine rates this move as an inaccuracy, but it
resulted in Black losing the will to play on and they resigned defeated $1 Good
game, GG $1} 1-0
