
Merry Christmas and Happy Holidays! 🎄🎁🥳
One of the interesting things with living in Australia is that with a time zone of GMT+11 in Sydney during our summer, Christmas starts and ends 16 to 19 hours earlier than in the continental United States! This means that if you’re watching this video and reading this article on Christmas Day, it’s already finished for me in Sydney! ☺️
This year, I had a good one and spent it with my family. I cooked a dinner of wagyu steak and roast veggies, and after my son had gone to bed, I played the following lovely unrated game. This was another game of the Queen Sacrifice Line in the Englund Gambit/Complex, which I wrote about again just last week. I love this line as it redeems the Englund Gambit/Complex trap opening, which is theoretically broken by the refutation that most intermediate players of the Queen’s Pawn Opening will eventually learn.
This game was a good example: my opponent clearly knew some of the theory of both the Englund Complex, playing the three critical moves (5. Bd2, 6. Nc3, and 7. Bb1) quickly and confidently; and the Queen Sacrifice Line (aka the Hambleton Variation) playing initially the engine recommended moves (11. Rb3), and then (11. Rb5).
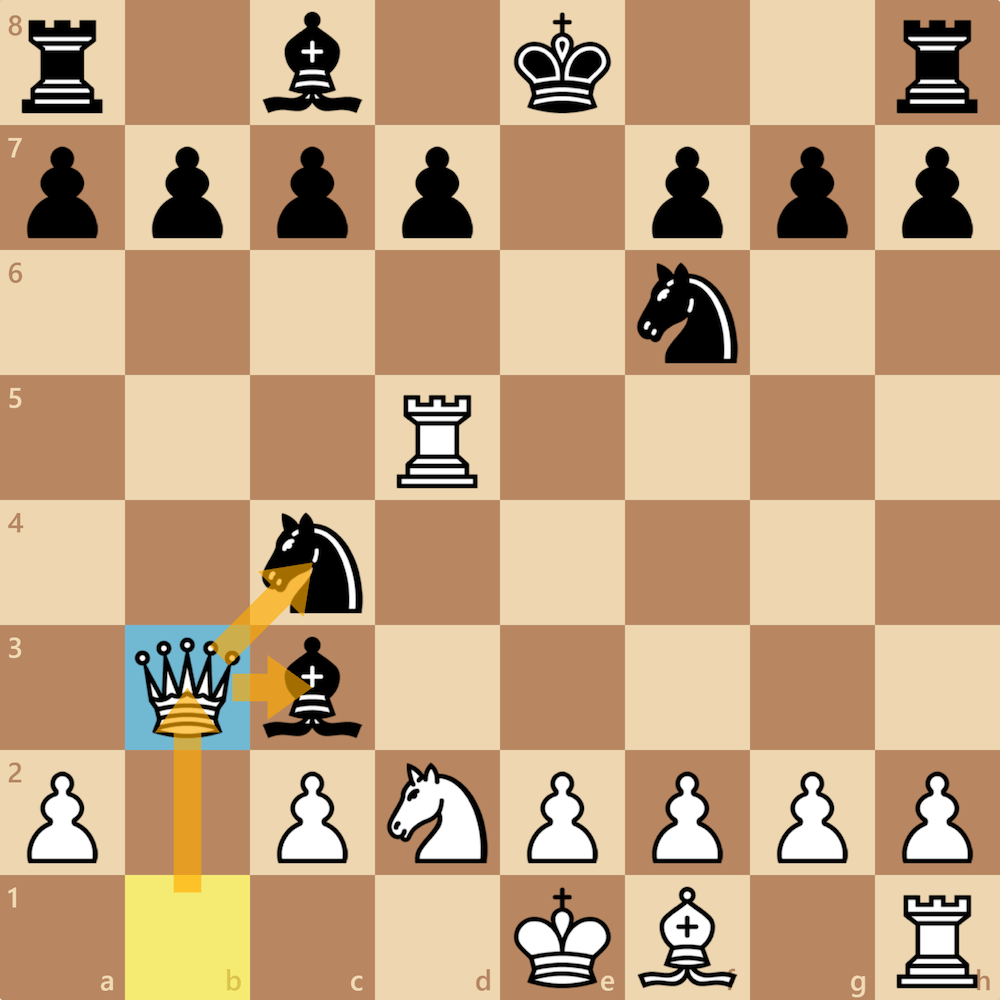
However, the Queen Sacrifice Line positions are rich in tactics and traps for Black. I’ve often experienced where if I keep the pressure on White’s pinned d2-knight, a position arises where White’s advantage closes to them finding a single accurate move, where all other moves are blunders! This occurred in this game in the following position at the beginning of turn 14.

.
.
.
.
.
.
.
.
.
.
.
.
.
.
.
.
.
.
.
.
.
.
.
The only good move for White is Qb3, ignoring the attack on the hanging d5-rook, and instead, forking Black’s critical c3-bishop and c4-knight. Black has nothing better than liquidating their attack (14… Bxd2+ 15. Rxd2 Nxd2 16. Kxd2) and thus, losing the initiative. White has breathing room to consolidate, develop, and make use of their relative advantage of having the queen in the middlegame and endgame.
In this game, White did not find the critical move, though I couldn’t transform it by committing to the winning move either.
However, my opportunity came a few turns later with another absolute pin and with (23… Rxe3) was able to force-win White’s queen as there was an impending discovered check, with a double attack! White didn’t find the correct sequence (they needed to accept the lost queen and “give it back” immediately), and at the end of the sequence, we emerged with numerically equal number of pieces (they had the rook pair and a bishop, and I had the bishop pair and a rook), but I had a massive queenside pawn majority (4 vs 1). Stockfish evaluates the position at about [-5] and certainly, this phase of the game was simple to approach. I forced piece trades to an endgame!
My opponent must be an adherent to the declaration, “never give up, never surrender”, and I respect that! They fought on in a lost endgame until checkmate. Good game, GG!
Once again, Merry Christmas everybody! Over the holidays, try playing Romantic style openings and also remember that the goal of chess is to have fun, not just to win!
* * *
Learn how to play the best chess opening attacks in the Romantic style, including the Englund Gambit/Complex with my new book, “Become a Chess Assassin!” available now on your local Amazon store!

[Event "Live Chess"]
[Site "Chess.com"]
[Date "2025.12.25"]
[Round "?"]
[White "Random Noob"]
[Black "vitualis"]
[Result "0-1"]
[TimeControl "600"]
[Termination "vitualis won by checkmate"]
[Link "https://www.chess.com/analysis/game/pgn/2j6bhLGTDg/analysis?move=85"]
[WhiteUrl ""]
[WhiteCountry "225"]
[WhiteTitle ""]
[BlackUrl "https://images.chesscomfiles.com/uploads/v1/user/3711094.b9866645.32x32o.b1cf5b001ab7@2x.webp"]
[BlackCountry "17"]
[BlackTitle ""]

1. d4 {[%clk 0:09:58.3][%timestamp 17]} 1... e5 {[%clk 0:09:59.2][%timestamp
8][%c_highlight e5;keyPressed;alt;opacity;0.8;square;e5;persistent;false]} 2.
dxe5 {[%clk 0:09:55.5][%timestamp 28] Englund Gambit Accepted $1} 2... Nc6 {[%clk
0:09:58.6][%timestamp 6]} 3. Nf3 {[%clk 0:09:51.8][%timestamp 37]} 3... Qe7
{[%clk 0:09:57.6][%timestamp 10]} 4. Bf4 {[%clk 0:09:44.4][%timestamp 74]} 4...
Qb4+ {[%clk 0:09:55.7][%timestamp 19][%c_arrow
b4b2;keyPressed;none;opacity;0.8;from;b4;to;b2;persistent;false,b4e1;keyPressed;none;opacity;0.8;from;b4;to;e1;persistent;false,b4f4;keyPressed;none;opacity;0.8;from;b4;to;f4;persistent;false][%c_highlight
b2;keyPressed;none;opacity;0.8;square;b2;persistent;false,e1;keyPressed;none;opacity;0.8;square;e1;persistent;false,f4;keyPressed;none;opacity;0.8;square;f4;persistent;false]
Killer Black Queen of the Englund Complex. Does White know the refutation $2} 5.
Bd2 $1 {[%clk 0:09:37.9][%timestamp 65][%c_effect
d2;square;d2;type;GreatFind;persistent;true][%c_highlight
d2;keyPressed;alt;opacity;0.8;square;d2;persistent;false]} 5... Qxb2 {[%clk
0:09:54.7][%timestamp 10][%c_highlight
d2;keyPressed;alt;opacity;0.8;square;d2;persistent;false]} 6. Nc3 $1 {[%clk
0:09:29.9][%timestamp 80][%c_effect
c3;square;c3;type;GreatFind;persistent;true][%c_highlight
c3;keyPressed;alt;opacity;0.8;square;c3;persistent;false,d2;keyPressed;alt;opacity;0.8;square;d2;persistent;false]}
6... Bb4 {[%clk 0:09:53.4][%timestamp 13][%c_highlight
c3;keyPressed;alt;opacity;0.8;square;c3;persistent;false,d2;keyPressed;alt;opacity;0.8;square;d2;persistent;false]}
7. Rb1 $1 {[%clk 0:09:22.5][%timestamp 74][%c_effect
b1;square;b1;type;GreatFind;persistent;true][%c_highlight
b1;keyPressed;alt;opacity;0.8;square;b1;persistent;false,c3;keyPressed;alt;opacity;0.8;square;c3;persistent;false,d2;keyPressed;alt;opacity;0.8;square;d2;persistent;false]
Well done $1 White has technically refuted the Englund Complex attack, and now
expects to be winning. But we have a trick up our sleeves $1} 7... Qxc3 $5 {[%clk
0:09:52.3][%timestamp 11][%c_effect
c3;square;c3;type;Interesting;persistent;true][%c_highlight
c3;keyPressed;alt;opacity;0.8;square;c3;persistent;false,a3;keyPressed;shift;opacity;0.8;square;a3;persistent;false][%c_arrow
b2a3;keyPressed;none;opacity;0.8;from;b2;to;a3;persistent;false] The GLORIOUS
queen sacrifice line (aka Hambleton Variation) in the Englund Complex $1 This is
potentially a very winning anti-refutation approach that redeems the Englund
Complex. We double-down and hold onto the initiative by sacrificing our queen $1}
8. Bxc3 {[%clk 0:09:20.9][%timestamp 16]} 8... Bxc3+ {[%clk
0:09:51.5][%timestamp 8]} 9. Nd2 {[%clk 0:09:13.7][%timestamp 72]} 9... Nxe5
{[%clk 0:09:51.2][%timestamp 3]} 10. Rb3 {[%clk 0:09:08.6][%timestamp
51][%c_highlight b3;keyPressed;alt;opacity;0.8;square;b3;persistent;false]
Impressive $1 White has clearly faced this before as they played Rb3, the most
accurate move, without hesitation $1} 10... Ba5 {[%clk 0:09:43.5][%timestamp
77][%c_arrow
a5d2;keyPressed;none;opacity;0.8;from;a5;to;d2;persistent;false,d2e1;keyPressed;none;opacity;0.8;from;d2;to;e1;persistent;false][%c_highlight
d2;keyPressed;none;opacity;0.8;square;d2;persistent;false] We want to hold onto
the pin} 11. Rb5 {[%clk 0:09:07][%timestamp 16][%c_highlight
b5;keyPressed;alt;opacity;0.8;square;b5;persistent;false,a1;keyPressed;shift;opacity;0.8;square;a1;persistent;false][%c_arrow
d1a1;keyPressed;none;opacity;0.8;from;d1;to;a1;persistent;false] This is another
highly accurate move $1 As before, I suspect that Random Noob knows some theory
here. Very often, White will make mistakes at this stage of the Queen Sac Line
as the best moves are difficult to find $1 Apart for Rb5, the other engine
recommended move is Qa1 $1} 11... Bc3 {[%clk 0:09:40][%timestamp 35] I think that
this is the best move and in a sense, I'm inviting White to make a mistake or
try a repetition. Engine recommendations are not especially helpful as Stockfish
evaluates that Black is losing. And so, many of the recommendations involve
trading down, which is not in our tactic interests. For instance, Bxd2+, or even
Nc6 and Nc4 which would likely prompt White to trade their rook for our bishop.}
12. Qb1 $6 {[%clk 0:08:54.7][%timestamp 123][%c_effect
b1;square;b1;type;Inaccuracy;persistent;true][%c_arrow
b5b3;keyPressed;none;opacity;0.8;from;b5;to;b3;persistent;false][%c_highlight
b3;keyPressed;none;opacity;0.8;square;b3;persistent;false] This move
demonstrates that White is reading the tactical mood $1 They've realised that my
attack is much stronger when their king is smothered $1} 12... Nc4 {[%clk
0:09:24.3][%timestamp 157][%c_arrow
g8f6;keyPressed;none;opacity;0.8;from;g8;to;f6;persistent;false][%c_highlight
f6;keyPressed;shift;opacity;0.8;square;f6;persistent;false] Immediately attack $1
Don't let go of the pressure $1} 13. Rd5 $2 {[%clk 0:08:23.8][%timestamp
309][%c_effect d5;square;d5;type;Mistake;persistent;true][%c_arrow
b1b3;keyPressed;none;opacity;0.8;from;b1;to;b3;persistent;false][%c_highlight
b3;keyPressed;none;opacity;0.8;square;b3;persistent;false] This is a very
natural move to defend the d2-knight $1 However, it's a mistake. The correct move,
Qb3 is hard to find $1} 13... Nf6 {[%clk 0:09:11.4][%timestamp 129]} 14. Rd3 $4
{[%clk 0:08:21.3][%timestamp 25][%c_effect
d3;square;d3;type;Blunder;size;100%2525;animated;false;persistent;true][%c_arrow
b1b3;keyPressed;none;opacity;0.8;from;b1;to;b3;persistent;false][%c_highlight
b3;keyPressed;none;opacity;0.8;square;b3;persistent;false,d3;keyPressed;none;opacity;0.8;square;d3;persistent;false]
I've often found that the Queen Sac Line can often force White to find a single
critical move, and this was one of those positions. The only move that wasn't
losing was Qb3, but White didn't find it last turn either $1 All other moves in
the position gives a winning evaluation to Black $1} 14... Ba5 $2  {[%clk
0:08:48.3][%timestamp 231][%c_effect
a5;square;a5;type;Mistake;size;100%2525;animated;false;persistent;true] However,
I didn't find it $1 The correct move was Nxd2 $1} (14... Nxd2 $1 {[%c_highlight
d2;keyPressed;alt;opacity;0.8;square;d2;persistent;false][%c_effect
d2;square;d2;type;GreatFind;persistent;true]} 15. Rxd2 Ne4 $1 {[%c_effect
e4;square;e4;type;GreatFind;size;100%25;animated;false;persistent;true] The pin
is just crushing $1} 16. Qb3 Bxd2+ 17. Kd1 Bh6 {And the game continues $1 White's
king is stuck in the centre, their queenside pawn structure damaged, and they
are down 3 points of material, and numerically, it's 3 pieces vs 5 $1 Stockfish
gives a favourable evaluation for Black at almost -5 $1}) 15. c3 {[%clk
0:08:11.9][%timestamp 94]} 15... Nxd2 {[%clk 0:08:21][%timestamp 273]} 16.
Kxd2 $6 {[%clk 0:08:05.3][%timestamp 66][%c_effect
d2;square;d2;type;Inaccuracy;size;100%2525;animated;false;persistent;true][%c_arrow
d3e3;keyPressed;none;opacity;0.8;from;d3;to;e3;persistent;false][%c_highlight
e3;keyPressed;none;opacity;0.8;square;e3;persistent;false] A very natural move,
but White needed to have the insight to find Re3+ first $1} 16... Ne4+ {[%clk
0:08:18.9][%timestamp 21]} 17. Ke3 {[%clk 0:07:49.6][%timestamp 157]} 17...
Nxc3 $4 {[%clk 0:07:29.8][%timestamp 491][%c_effect
c3;square;c3;type;Blunder;persistent;true][%c_highlight
c3;keyPressed;none;opacity;0.8;square;c3;persistent;false,c5;keyPressed;none;opacity;0.8;square;c5;persistent;false,f6;keyPressed;none;opacity;0.8;square;f6;persistent;false][%c_arrow
e4c5;keyPressed;none;opacity;0.8;from;e4;to;c5;persistent;false,e4f6;keyPressed;none;opacity;0.8;from;e4;to;f6;persistent;false]
Here, I guess I blinked $1 I thought that this piece could be safely captured, but
it's a blunder.} 18. Qb3 $1 {[%clk 0:07:26.2][%timestamp 234][%c_effect
b3;square;b3;type;GreatFind;persistent;true][%c_highlight
b3;keyPressed;alt;opacity;0.8;square;b3;persistent;false] White finds the best
move which essentially traps my knight $1} 18... O-O {[%clk 0:07:16.7][%timestamp
131] I realised that the knight might be a lost, so I castled my king out of
danger first} 19. f3 {[%clk 0:07:03.5][%timestamp 227][%c_arrow
e3f3;keyPressed;none;opacity;0.8;from;e3;to;f3;persistent;false][%c_highlight
f3;keyPressed;shift;opacity;0.8;square;f3;persistent;false] This is a relative
mistake. White is trying to move their king to safety. This is the right idea,
but the wrong execution. Kf3 was the correct move.} 19... Re8+ {[%clk
0:07:15.1][%timestamp 16]} 20. Kf2 $1 {[%clk 0:06:59.6][%timestamp 39][%c_effect
f2;square;f2;type;GreatFind;persistent;true][%c_highlight
f2;keyPressed;alt;opacity;0.8;square;f2;persistent;false]} 20... Bb6+ {[%clk
0:07:04.7][%timestamp 104]} 21. e3 {[%clk 0:06:53.7][%timestamp 59]} 21... d6
{[%clk 0:06:26][%timestamp 387] I'd accepted that the knight was lost. d6 opens
the diagonal for my light square bishop.} 22. Qxc3 {[%clk 0:06:50.9][%timestamp
28]} 22... Bf5 {[%clk 0:06:15.7][%timestamp 103]} 23. Rd5 {[%clk
0:06:25.4][%timestamp 255]} 23... Rxe3 {[%clk 0:06:02.7][%timestamp 130] I'm
proud of this tactic $1 The correct move for White is to \"give back\" their
queen, so Qxe3 Bxe3+ Kxe3. We'd enter a game where White has an extra Rook for
Black's three extra pawns. It's not a simple game and White needs to prove that
they will be able to win, but they have the advantage.} 24. Qc4 $4 {[%clk
0:06:00][%timestamp 254][%c_effect
c4;square;c4;type;Blunder;size;100%2525;animated;false;persistent;true][%c_highlight
c4;keyPressed;none;opacity;0.8;square;c4;persistent;false] In this game,
however, White engaged in overthinking, and decided to play this line. I think
the idea was that they thought that the development was better, but it was a
miscalculation and blunder. Black is much better by retaining the bishop pair $1}
24... Rc3+ $1 {[%clk 0:05:13.7][%timestamp 490][%c_effect
c3;square;c3;type;GreatFind;persistent;true][%c_highlight
c3;keyPressed;alt;opacity;0.8;square;c3;persistent;false,f2;keyPressed;none;opacity;0.8;square;f2;persistent;false,c4;keyPressed;none;opacity;0.8;square;c4;persistent;false][%c_arrow
b6f2;keyPressed;none;opacity;0.8;from;b6;to;f2;persistent;false,c3c4;keyPressed;none;opacity;0.8;from;c3;to;c4;persistent;false]
Discovered check with a double attack $1} 25. Kg3 {[%clk 0:05:54.4][%timestamp
56]} 25... Rxc4 {[%clk 0:05:12.3][%timestamp 14]} 26. Bxc4 {[%clk
0:05:52.6][%timestamp 18]} 26... Be6 {[%clk 0:05:04.5][%timestamp 78] My
approach is now simple: force piece trades $1} 27. Rhd1 {[%clk
0:05:20.4][%timestamp 322]} 27... Bxd5 {[%clk 0:04:58.7][%timestamp 58]} 28.
Bxd5 {[%clk 0:05:17.9][%timestamp 25]} 28... c6 {[%clk 0:04:57.9][%timestamp 8]}
29. Be4 {[%clk 0:05:12.7][%timestamp 52]} 29... Bc7 {[%clk 0:04:49.4][%timestamp
85]} 30. Rb1 {[%clk 0:05:07.3][%timestamp 54]} 30... d5+ {[%clk
0:04:47.4][%timestamp 20][%c_arrow
c7g3;keyPressed;none;opacity;0.8;from;c7;to;g3;persistent;false,d5e4;keyPressed;none;opacity;0.8;from;d5;to;e4;persistent;false][%c_highlight
g3;keyPressed;none;opacity;0.8;square;g3;persistent;false,e4;keyPressed;none;opacity;0.8;square;e4;persistent;false]
Another discovered check with a double attack $1} 31. Kg4 {[%clk
0:04:53.6][%timestamp 137]} 31... dxe4 {[%clk 0:04:46.5][%timestamp 9]} 32. fxe4
{[%clk 0:04:51.2][%timestamp 24]} 32... b6 {[%clk 0:04:43.9][%timestamp 26]} 33.
Rd1 {[%clk 0:04:45.8][%timestamp 54]} 33... c5 {[%clk 0:04:40.9][%timestamp 30]}
34. Rd7 {[%clk 0:04:43.7][%timestamp 21]} 34... Be5 {[%clk 0:04:31.1][%timestamp
98]} 35. Kf5 {[%clk 0:04:42.1][%timestamp 16]} 35... Bxh2 {[%clk
0:04:12.8][%timestamp 183]} 36. e5 {[%clk 0:04:34.1][%timestamp 80]} 36... c4
{[%clk 0:04:08][%timestamp 48]} 37. e6 {[%clk 0:04:30.5][%timestamp 36] I'm
impressed that White fought to the end $1} 37... fxe6+ {[%clk
0:04:06.5][%timestamp 15]} 38. Kxe6 {[%clk 0:04:28][%timestamp 25]} 38... h6
{[%clk 0:03:50.1][%timestamp 164] Back rank checkmate prophylaxis} 39. Kf5
{[%clk 0:04:24.6][%timestamp 34]} 39... c3 {[%clk 0:03:44.7][%timestamp 54]} 40.
Kg6 {[%clk 0:04:21.6][%timestamp 30] I admire the tenacity $1 My rook must stay on
the back rank to prevent Rd8#. But this is no problem} 40... c2 {[%clk
0:03:37.8][%timestamp 69]} 41. Rc7 $4 {[%clk 0:04:19.8][%timestamp 18][%c_effect
c7;square;c7;type;Blunder;persistent;true][%c_highlight
c7;keyPressed;none;opacity;0.8;square;c7;persistent;false][%c_arrow
h2c7;keyPressed;none;opacity;0.8;from;h2;to;c7;persistent;false] The last gasp.
I like to think that this was a bluff rather than a blunder} 41... Bxc7 {[%clk
0:03:29.1][%timestamp 87]} 42. g4 {[%clk 0:04:13.8][%timestamp 60]} 42... c1=Q
{[%clk 0:03:25.8][%timestamp 33]} 43. g5 {[%clk 0:04:12.1][%timestamp 17]} 43...
Qxg5# {[%clk 0:03:24.4][%timestamp 14][%c_effect
g8;square;g8;type;Winner;animated;true,g6;square;g6;type;CheckmateWhite;animated;true]
Let it not be said that the opponent's king was a coward on the field of battle $1
Good game, GG $1} 0-1
