If you follow my blog and channel, you’ll know that I like tactical, attacking chess in the romantic style. If you’re new to my blog, hello! 👋 Please consider subscribing to my YouTube channel, follow my blog, and send me a friend request on chess.com! I publish three or four videos a week, each with an accompany blog article that covers my chess journey as a beginner-intermediate player.
A phenomenon observed when playing an aggressive attacking style is that it is often more effective than expected, insofar as compared to engine evaluation. This can be understood from a psychological perspective. By forcing our opponent to focus on immediate threats it, (i) puts our opponent on the defensive, (ii) can create the feeling that they are losing, especially when we gain concessions, and (iii) can result in our opponent losing sight of longer-term strategic considerations as their attention is drawn to the current position. The effect is that we capture the initiative and the flow of the game, and we invite our opponent to make mistakes and blunder!
The following game was a rather unusual 10+5 game of rapid where I played a total of 33 checks on my opponent, which is two-thirds of the 51 moves that I made! In this game, I took an early advantage, blunder that advantage, but then use an extremely aggressive approach to turn the tables! Let’s go!
I had the black pieces in this game, White lead with the Italian, I responded with the Two Knights Defense, and then White attempted to play the Fried Liver Attack (1. e4 e5 2. Nf3 Nc6 3. Bc4 Nf6 4. Ng5 d5 5. exd5). I’ve often responded to White’s Knight Attack with the very tricky Ponziani-Steinitz Gambit (4. Ng5 Nxe4!?), which is a very fun line, but rather unsound.
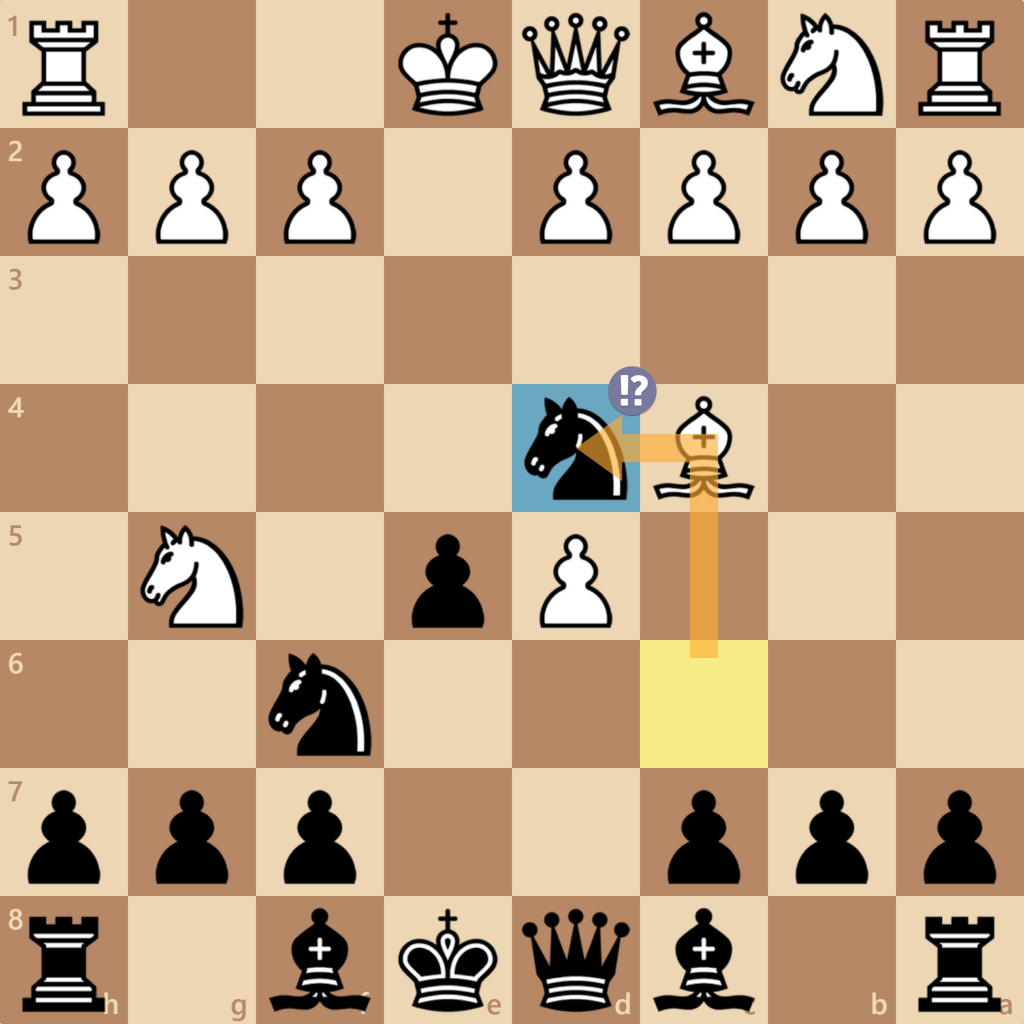
In this game, I opted to try an uncommon and aggressive counterattack to the Fried Liver Attack, which is the Fritz Variation (5… Nd4). According to the Lichess community database, this is the single most winning line from the position with Black winning 56% to White 41%!
Note:
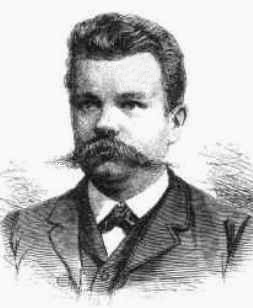
Alexander Fritz (1857-1932) was a German chess master, who suggested (5… Nd4) to Schlechter, who analysed it in Deutsche Schachzeitung (English: German Chess Magazine), 1904.
Some of the earliest examples of Fritz Variation games in the LumbrasGigabase were played in the early 20th century by Lasker, Englund, and Rubinstein!
A bit of trivia, there is an extremely delicious, and unexpected smothered checkmate line out of the Fritz Variation, which uses the same tactical structure as the Blackburne Shilling Gambit. 🤩
In this game, White plays the best response with (6. c3) attacking the forward knight, but Black can counterattack White’s bishop with (6… b5). In this position, the “simple” surface level Fried Liver Attack (White’s knight and bishop teaming up to attack Black’s weak f7-pawn) is over. Interestingly, White’s single best move in this position is the un-develop their bishop with (7. Bf1)! In this game, White either didn’t see or couldn’t accept that, and instead, we traded minor pieces, moving the game back to equality [0.00].
On move 9, White’s best move was another unintuitive move, the aggressive (9. Qh5). Instead, they played the seemingly excellent (9. d4), which defends both their advanced e-pawn and g5-knight. However, this was a mistake [-0.9] and fundamentally, White’s pieces are somewhat overextended. And indeed, my counterattack began with (9… Bb4+!), my first check in the game! White’s only good move in the position was another unintuitive move (10. Kf1) – which they didn’t see. They played (10. Nc3??), a blunder, and a couple of moves later the evaluation is [-3] to [-4], White’s pawn structure is damaged on both sides, and the king has been forced to move, losing the right to castle. Although we had piece and material equality, White’s king was exposed, and I was clearly winning!
I chased White’s king with checks, trying to find an “in” but on move 19, made a mistake by being greedy and capturing a pawn (19. Qxh2+). White’s response (20. Rf2!) meant a double attack; their rook on my queen, and their pawn on my bishop. I thought that the bishop was lost so played a desperado (20… Bxf3+), but this was a blunder [-1.2 → +2.7] as I could have counterattacked White’s queen with Be6!
I was annoyed at myself at having made that mistake. I knew that I was probably in a losing position. White had four pieces (rook pair, bishop, and queen), while I only had three (rook pair and queen). I took stock of what I had. My king was safe, and I had a pawn advantage. White’s king was very exposed in the centre of the board. My queen was well developed.
If I allowed White to consolidate or simplify by trading pieces, it will be a loss by attrition to an endgame. So, the strategy is to attack repeatedly, and to see whether it would be possible to regain an advantage from a mistake!
By move 27, I had given 10 checks in a row (!!) and chased White’s king to the corner on h1 with my queen. It seemed like we might be shuffling, and so I offered my opponent a draw. A draw is not losing, it’s a tie! 😅 However, White, being a good sport declined the draw request and we play on!
After this point, it became clear that White was going to shuffle their king towards the queenside and 8 checks later (🤣), finally made a mistake. With (36. Kb3?). If White’s king was in the centre surrounded by their pieces, I had no “in” with just my queen. Although it was correct for White to bring their king back to the centre, their goal should then be to trade queens. However, under the relentless check, White perhaps didn’t recognise that I was trying to corral their king onto the b-file! As with their king on fully open b-file, it gave me an opportunity to activate a rook into the attack (36… Rab8+).
White’s position now collapses. White had one of two choices – move their king to the a-file, which visually seems blunderous and inviting a ladder checkmate (but was actually “okay”), or to block the check with either their queen or bishop. White played (37. Bb4??), probably the most intuitive move in the position, but it’s a blunder! The bishop is pinned to the king and (37… a5!) places pressure on the pinned piece! The evaluation now flips from [+2.2 → -2.7].
More moves, more checks, and manoeuvring with rooks and queen can be quite complicated when one’s king is exposed. White blunders on move 43, missing the impending royal fork (43… Rxd4+). And with the home stretch in view, we had 7 more checks and White resigned on move 51, one step away from checkmate. Good game, GG!
The big takeaway of this game is there is a psychological advantage, and thus, a tactical one in creating repeated attacks. In this game, this was expressed by the relentless checks, eventually driving the opponent into a game changing blunder!
Game: https://lichess.org/EjQBK6z2
[Event "Rated Rapid game"]
[Site "https://lichess.org/EjQBK6z2"]
[Date "2024.03.31"]
[Round "?"]
[White "synaps"]
[Black "vitualis"]
[Result "0-1"]
[UTCDate "2024.03.31"]
[UTCTime "07:43:15"]
[WhiteElo "1587"]
[BlackElo "1593"]
[WhiteRatingDiff "-6"]
[BlackRatingDiff "+18"]
[TimeControl "600+5"]
[ECO "C57"]
[Opening "Italian Game: Two Knights Defense, Fritz Variation"]
[Termination "Normal"]
[Annotator "lichess.org"]
[BlackUrl "https://images.chesscomfiles.com/uploads/v1/user/3711094.f52a0759.50x50o.ab18600a8723@2x.png"]
[BlackCountry "17"]
[BlackTitle ""]
[WhiteUrl "https://images.chesscomfiles.com/uploads/v1/game_analysis_self/19047e3a-0b47-11ef-9c3c-9340e8bab049.fc2a1734.160x160o.3820947c79ca.png"]
[WhiteCountry ""]
[WhiteTitle ""]

1. e4 {[%clk 0:10:00]} 1... e5 {[%clk 0:10:00]} 2. Nf3 {[%clk 0:10:03]} 2... Nc6
{[%clk 0:10:03]} 3. Bc4 {[%clk 0:10:07]} 3... Nf6 {[%clk 0:10:07]} 4. Ng5 {[%clk
0:10:07]} 4... d5 {[%clk 0:10:10]} 5. exd5 {[%clk 0:10:11]} 5... Nd4 {[%clk
0:09:51] Italian Game: Two Knights Defense, Fritz Variation [+0.4]. I recently
discovered this line as a way to play against the Fried Liver Attack.
Previously, I usually played the fun but rather unsound Ponziani-Steinitz
Gambit. The Fritiz Variation is an aggressive counterattack by Black, and Black
has a win advantage of 56\% vs White's 41\% $1} 6. c3 {[%clk 0:09:41]} 6... b5
{[%clk 0:09:46] Everything is a book move up to this point...} 7. cxd4 $6 {[%clk
0:09:08][%c_effect d4;square;d4;type;Inaccuracy;persistent;true][%c_arrow
c4f1;keyPressed;none;from;c4;opacity;0.8;to;f1;persistent;false][%c_highlight
f1;keyPressed;none;opacity;0.8;square;f1;persistent;false] And here, White plays
a very understandable inaccuracy and Black has successfully stopped the Fried
Liver $1 [0.00]. Surprisingly, the most accurate move for White is a backward
bishop move Bf1 $1} 7... bxc4 {[%clk 0:09:50]} 8. dxe5 {[%clk 0:09:12]} 8... Nxd5
{[%clk 0:09:27][%c_arrow
d8d5;keyPressed;none;from;d8;opacity;0.8;to;d5;persistent;false][%c_highlight
d5;keyPressed;shift;opacity;0.8;square;d5;persistent;false] Qxd5 is an
alternative, and might be slightly better} 9. d4 $2 {[%clk 0:09:10][%c_effect
d4;square;d4;type;Mistake;persistent;true][%c_highlight
h5;keyPressed;none;opacity;0.8;square;h5;persistent;false][%c_arrow
d1h5;keyPressed;none;from;d1;opacity;0.8;to;h5;persistent;false] This is a
logical move, defending the e5-pawn and the g5-knight at the same time. However,
it's a mistake. White's pieces are overextended with the attempted Fried Liver
[-0.9].} 9... Bb4+ $1 {[%clk 0:09:04][%c_effect
b4;square;b4;type;GreatFind;persistent;true][%c_highlight
b4;keyPressed;alt;opacity;0.8;square;b4;persistent;false,f1;keyPressed;none;opacity;0.8;square;f1;persistent;false][%c_arrow
e1f1;keyPressed;none;from;e1;opacity;0.8;to;f1;persistent;false]} 10. Nc3 $4
{[%clk 0:09:07][%c_effect
c3;square;c3;type;Blunder;persistent;true][%c_highlight
c3;keyPressed;none;opacity;0.8;square;c3;persistent;false] A very natural move,
but it's a blunder $1 [-3.3]} 10... Nxc3 {[%clk 0:09:07]} 11. bxc3 {[%clk
0:09:02]} 11... Bxc3+ {[%clk 0:09:10][%c_arrow
c3e1;keyPressed;none;from;c3;opacity;0.8;to;e1;persistent;false,c3a1;keyPressed;none;from;c3;opacity;0.8;to;a1;persistent;false][%c_highlight
e1;keyPressed;none;opacity;0.8;square;e1;persistent;false,a1;keyPressed;none;opacity;0.8;square;a1;persistent;false]
Absolute fork $1} 12. Bd2 {[%clk 0:09:00]} 12... Qxg5 {[%clk 0:08:55][%c_arrow
c3a1;keyPressed;none;from;c3;opacity;0.8;to;a1;persistent;false][%c_highlight
a1;keyPressed;shift;opacity;0.8;square;a1;persistent;false] In the game, I
decided to remove White's forward knight rather than their a1-rook as I deemed
it to be more troublesome due to its activity, and gave me the opportunity to
develop my queen. Stockfish agrees that the knight is worth almost as much as
the rook, but still prefers the rook [-3.3 $37 -3.1].} 13. Bxc3 {[%clk 0:08:48]}
13... Qxg2 {[%clk 0:08:57]} 14. Rf1 {[%clk 0:08:20]} 14... O-O {[%clk 0:08:35]}
15. Qe2 {[%clk 0:08:12]} 15... Bg4 $2 {[%clk 0:08:02][%c_effect
g4;square;g4;type;Mistake;persistent;true][%c_arrow
c8h3;keyPressed;none;from;c8;opacity;0.8;to;h3;persistent;false][%c_highlight
h3;keyPressed;none;opacity;0.8;square;h3;persistent;false] I attack White's
queen, but this wasn't the best move...} 16. Qxc4 $2 {[%clk 0:07:58][%c_effect
c4;square;c4;type;Mistake;persistent;true][%c_arrow
f2f3;keyPressed;none;from;f2;opacity;0.8;to;f3;persistent;false][%c_highlight
f3;keyPressed;none;opacity;0.8;square;f3;persistent;false] However, White
responded to the provocation with a mistake [-4.1]} 16... Qe4+ {[%clk 0:08:05]}
17. Kd2 {[%clk 0:07:57]} 17... Rfd8 $2 {[%clk 0:07:37][%c_effect
d8;square;d8;type;Mistake;persistent;true][%c_arrow
e4f4;keyPressed;none;from;e4;opacity;0.8;to;f4;persistent;false][%c_highlight
f4;keyPressed;none;opacity;0.8;square;f4;persistent;false] Somewhat complicated
position...} 18. f3 $6 {[%clk 0:08:00][%c_effect
f3;square;f3;type;Inaccuracy;persistent;true][%c_arrow
c4d3;keyPressed;none;from;c4;opacity;0.8;to;d3;persistent;false][%c_highlight
d3;keyPressed;none;opacity;0.8;square;d3;persistent;false] It looks like a fork,
but it isn't due to checks $1 White's best approach was to try to trade queens}
18... Qf4+ $1 {[%clk 0:07:29][%c_effect
f4;square;f4;type;GreatFind;persistent;true][%c_highlight
f4;keyPressed;alt;opacity;0.8;square;f4;persistent;false]} 19. Ke2 {[%clk
0:07:28]} 19... Qxh2+ $2 {[%clk 0:07:16][%c_effect
h2;square;h2;type;Mistake;persistent;true][%c_arrow
g4e6;keyPressed;none;from;g4;opacity;0.8;to;e6;persistent;false][%c_highlight
e6;keyPressed;none;opacity;0.8;square;e6;persistent;false] A bit of a mistake...
moving the bishop out of the attack is the safest approach...} 20. Rf2 $1 {[%clk
0:07:31][%c_effect f2;square;f2;type;GreatFind;persistent;true][%c_highlight
f2;keyPressed;alt;opacity;0.8;square;f2;persistent;false] ... as White now has a
counter double-attack.} 20... Bxf3+ $4 {[%clk 0:06:42][%c_effect
f3;square;f3;type;Blunder;persistent;true][%c_highlight
f3;keyPressed;none;opacity;0.8;square;f3;persistent;false,e6;keyPressed;none;opacity;0.8;square;e6;persistent;false][%c_arrow
g4e6;keyPressed;none;from;g4;opacity;0.8;to;e6;persistent;false] I thought that
I had lost my bishop so played a desperado, which was a blunder [-1.2 $37 +2.7].
Stockfish finds a way out with Be6, counterattacking White's queen.} 21. Kxf3
{[%clk 0:07:29]} 21... Qh5+ {[%clk 0:06:39] I'm down a piece, but do have a pawn
majority. White's king is very exposed. So the tactic $2 Keep attacking White's
king, preferably with checks, to probe for an eventual weakness or mistake $1} 22.
Kg2 {[%clk 0:06:58]} 22... Qg4+ {[%clk 0:06:40]} 23. Kf1 {[%clk 0:07:02]} 23...
Qh3+ {[%clk 0:06:38]} 24. Kg1 {[%clk 0:06:50]} 24... Qg3+ {[%clk 0:06:38]} 25.
Rg2 {[%clk 0:06:54]} 25... Qe3+ {[%clk 0:06:42]} 26. Kh1 {[%clk 0:06:38]} 26...
Qh3+ {[%clk 0:06:45]} 27. Rh2 {[%clk 0:06:41]} 27... Qf3+ {[%clk 0:06:48] Here,
I knew that White was probably ahead, but it almost looks like I could do
perpetually check given that this is the tenth check in a row. I offerred a
draw... but White declines $1} 28. Kg1 {[%clk 0:06:38]} 28... Qg3+ {[%clk
0:06:52]} 29. Rg2 {[%clk 0:06:39]} 29... Qe3+ {[%clk 0:06:56]} 30. Kf1 $6 {[%clk
0:06:35][%c_effect f1;square;f1;type;Inaccuracy;persistent;true][%c_arrow
g2f2;keyPressed;none;from;g2;opacity;0.8;to;f2;persistent;false][%c_highlight
f2;keyPressed;none;opacity;0.8;square;f2;persistent;false] White begins to
shuffle their king towards the queenside... And I wondered whether they would go
too far - specifically, onto the b-file which would allow me to develop one of
my rooks into the game $1} 30... Qf3+ {[%clk 0:06:59]} 31. Rf2 {[%clk 0:06:38]}
31... Qh3+ {[%clk 0:07:03]} 32. Ke1 {[%clk 0:06:37]} 32... Qe3+ {[%clk 0:07:05]}
33. Re2 {[%clk 0:06:29]} 33... Qg3+ {[%clk 0:07:07]} 34. Kd1 {[%clk 0:06:26]}
34... Qg1+ $5 {[%clk 0:06:23][%c_arrow
g3g4;keyPressed;none;from;g3;opacity;0.8;to;g4;persistent;false][%c_highlight
g4;keyPressed;none;opacity;0.8;square;g4;persistent;false][%c_effect
g1;square;g1;type;Interesting;persistent;true] Stockfish thinks that Qg4 is the
most accurate move, however, my goal was to corral White's king to the b-file $1}
35. Kc2 {[%clk 0:06:26]} 35... Qg6+ {[%clk 0:06:24]} 36. Kb3 $2 {[%clk
0:05:46][%c_effect b3;square;b3;type;Mistake;persistent;true][%c_arrow
c2c1;keyPressed;none;from;c2;opacity;0.8;to;c1;persistent;false,c2d1;keyPressed;none;from;c2;opacity;0.8;to;d1;persistent;false,c4d3;keyPressed;none;from;c4;opacity;0.8;to;d3;persistent;false][%c_highlight
c1;keyPressed;none;opacity;0.8;square;c1;persistent;false,d1;keyPressed;shift;opacity;0.8;square;d1;persistent;false,d3;keyPressed;shift;opacity;0.8;square;d3;persistent;false]
Finally $1 This was a mistake [+1.5].} 36... Rab8+ {[%clk 0:06:27]} 37. Bb4 $4
{[%clk 0:05:11][%c_effect b4;square;b4;type;Blunder;persistent;true][%c_arrow
b3a3;keyPressed;none;from;b3;opacity;0.8;to;a3;persistent;false,b3a4;keyPressed;none;from;b3;opacity;0.8;to;a4;persistent;false][%c_highlight
a3;keyPressed;none;opacity;0.8;square;a3;persistent;false,a4;keyPressed;none;opacity;0.8;square;a4;persistent;false,b4;keyPressed;none;opacity;0.8;square;b4;persistent;false]
Moving the king onto the a-file is actually the correct move, even though it
LOOKS blunderous $1 Blocking with the bishop looks like it makes sense, but the
bishop is pinned $1 [+2.2 $37 -2.7]} 37... a5 $1 {[%clk 0:06:28][%c_effect
a5;square;a5;type;GreatFind;persistent;true][%c_highlight
a5;keyPressed;alt;opacity;0.8;square;a5;persistent;false] Place pressure on the
pinned piece $1} 38. a3 {[%clk 0:04:56]} 38... axb4 {[%clk 0:06:23]} 39. axb4
{[%clk 0:05:00]} 39... Qg3+ {[%clk 0:06:15]} 40. Kc2 {[%clk 0:04:47]} 40... Qg6+
{[%clk 0:05:52]} 41. Kd2 $2 {[%clk 0:04:48][%c_effect
d2;square;d2;type;Mistake;persistent;true]} 41... Qg5+ $2  {[%clk
0:05:22][%c_effect g5;square;g5;type;Mistake;persistent;true][%c_arrow
c7c5;keyPressed;none;from;c7;opacity;0.8;to;c5;persistent;false][%c_highlight
c5;keyPressed;none;opacity;0.8;square;c5;persistent;false] Admittedly, this is
quite an obscure tactic. The idea is that c-pawn can't be captured by the d-pawn
(pinned), or the b-pawn (as this opens  the b-file for my r-rook), or the queen
(as this opens the c-file for one of my rooks, winning tempo against White's
queen).} 42. Re3 $2 {[%clk 0:04:42][%c_effect
e3;square;e3;type;Mistake;persistent;true][%c_arrow
d2c3;keyPressed;none;from;d2;opacity;0.8;to;c3;persistent;false][%c_highlight
c3;keyPressed;none;opacity;0.8;square;c3;persistent;false] A mistake [-6.5]}
42... Qf4 $2  {[%clk 0:05:12][%c_arrow
c7c5;keyPressed;none;from;c7;opacity;0.8;to;c5;persistent;false][%c_highlight
c5;keyPressed;none;opacity;0.8;square;c5;persistent;false][%c_effect
f4;square;f4;type;Mistake;persistent;true] Same as previous move, c5 is best.}
43. Rf1 $4 {[%clk 0:04:40][%c_effect
f1;square;f1;type;Blunder;persistent;true][%c_highlight
f1;keyPressed;none;opacity;0.8;square;f1;persistent;false,d3;keyPressed;none;opacity;0.8;square;d3;persistent;false][%c_arrow
d2d3;keyPressed;none;from;d2;opacity;0.8;to;d3;persistent;false] However, it's
really difficult for White to navigate with their queen so exposed. White
attempts to attack my queen, but misses the impending royal fork $1 [-M17]} 43...
Rxd4+ $1 {[%clk 0:05:05][%c_arrow
d4d2;keyPressed;none;from;d4;opacity;0.8;to;d2;persistent;false,d4c4;keyPressed;none;from;d4;opacity;0.8;to;c4;persistent;false][%c_highlight
d2;keyPressed;none;opacity;0.8;square;d2;persistent;false,c4;keyPressed;none;opacity;0.8;square;c4;persistent;false,d4;keyPressed;alt;opacity;0.8;square;d4;persistent;false][%c_effect
d4;square;d4;type;GreatFind;persistent;true]} 44. Qxd4 {[%clk 0:04:15]} 44...
Qxd4+ {[%clk 0:05:08]} 45. Rd3 {[%clk 0:04:11]} 45... Qxb4+ {[%clk 0:05:04]} 46.
Ke3 {[%clk 0:04:14]} 46... Qc5+ {[%clk 0:04:52]} 47. Kf4 {[%clk 0:04:08]} 47...
Qc4+ {[%clk 0:04:41]} 48. Ke3 {[%clk 0:04:11]} 48... h6 {[%clk 0:04:37] Remove
possibility of hanging back rank checkmate...} 49. Rfd1 {[%clk 0:04:01]} 49...
Qc5+ {[%clk 0:04:35]} 50. Ke4 {[%clk 0:04:03]} 50... Rb4+ {[%clk 0:04:19]} 51.
Kf5 $2 {[%clk 0:04:00][%c_effect
f5;square;f5;type;Mistake;persistent;true][%c_arrow
d3d4;keyPressed;none;from;d3;opacity;0.8;to;d4;persistent;false][%c_highlight
d4;keyPressed;none;opacity;0.8;square;d4;persistent;false] [-M14 $37 -M2]} 51...
Qf2+ {[%clk 0:04:14][%c_effect g8;square;g8;type;Winner][%c_arrow
f7e6;keyPressed;none;from;f7;opacity;0.8;to;e6;persistent;false,g7f6;keyPressed;none;from;g7;opacity;0.8;to;f6;persistent;false,f7g6;keyPressed;none;from;f7;opacity;0.8;to;g6;persistent;false,h6g5;keyPressed;none;from;h6;opacity;0.8;to;g5;persistent;false,b4h4;keyPressed;none;from;b4;opacity;0.8;to;h4;persistent;false,f2f5;keyPressed;none;from;f2;opacity;0.8;to;f5;persistent;false][%c_highlight
e6;keyPressed;none;opacity;0.8;square;e6;persistent;false,f6;keyPressed;none;opacity;0.8;square;f6;persistent;false,g6;keyPressed;none;opacity;0.8;square;g6;persistent;false,g5;keyPressed;none;opacity;0.8;square;g5;persistent;false,e4;keyPressed;none;opacity;0.8;square;e4;persistent;false,f4;keyPressed;none;opacity;0.8;square;f4;persistent;false,g4;keyPressed;none;opacity;0.8;square;g4;persistent;false,f5;keyPressed;none;opacity;0.8;square;f5;persistent;false]
White can avoid checkmate for one turn with Rf3, but opts to resign. GG $1} 0-1

[…] Historically, I’ve tended to play the Ponziani-Steinitz Gambit against the Knight Attack, but more recently, I’ve gravitated towards the Two Knights Defense, Fritz Variation. […]
LikeLike