The Chessnut PRO is a brilliant tournament-sized electronic chess board that works great with chess.com! However, one of it’s cons is that the included standard wooden pieces are a bit basic.
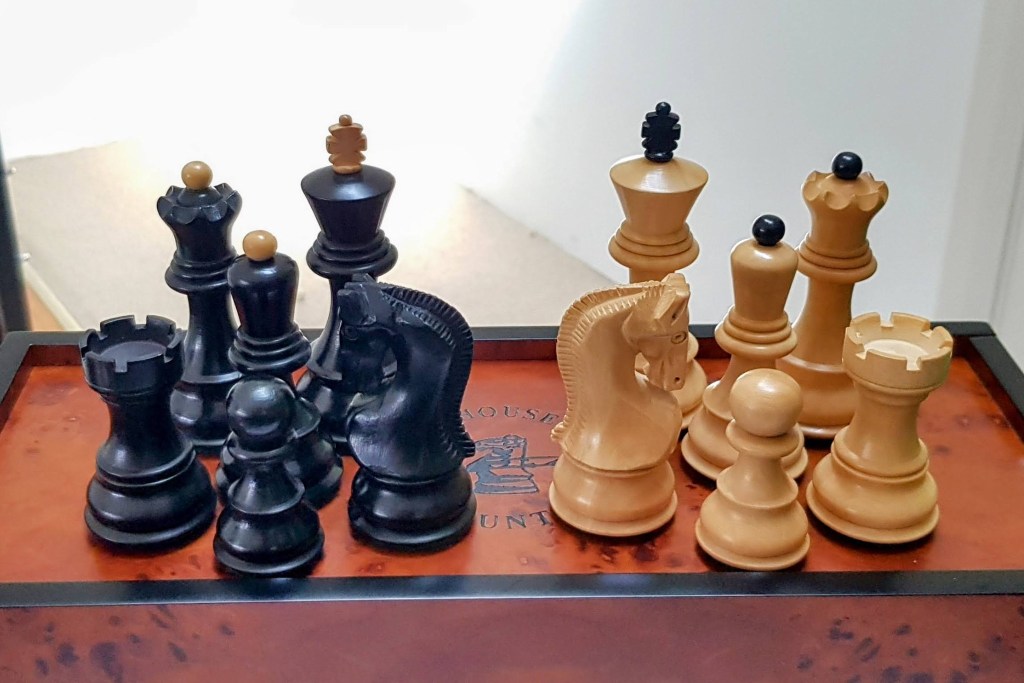
I’ve customised a set of premium pieces to work with the PRO! Based on the feedback from the community, the set that was selected was the Zagreb ’59 Series chessmen.
One of the great things with Chessnut is that they sell the sensor chips inside the pieces so you can customise and create your own pieces!
Part 1 – it begins!
The journey was more complicated than I had anticipated. I initially had what I thought was a very clever idea to mix fine lead shot with clay, to help increase the weight of the filler material, without overly diminishing the sensor sensitivity. This ended up to be a dead end pathway, and I had to remake three pawns with just clay as the filler.
Removing the weights was also rather difficult and by the end of the first dozen pieces or so, I was starting to question my life choices… 🤣
Part 2 – “Hot water dip” method for weight removal!
After struggling through around half the pieces, and sadly, slightly cracking a white rook and pawn due to impatience, I discovered a way that was a substantial improvement! Dipping the base of the piece and the exposed metal weight in scalding hot water for 5-10 seconds helped with releasing the glue. With the use of an hobby knife to slide between the weight and the wood, the weight would often come out easily within 3-5 minutes!
Part 3 – Smoothing the Base!
I hadn’t anticipated that the air drying clay that I had used would shrink on drying. Although this wasn’t a problem in fixing the sensor chips to the correct location, it meant that the base of the pieces was no longer a smooth surface as the clay has sunken in slightly. Annoying, as the felt isn’t going to adhere well like that. I addressed this with some wall repair putty.
Part 4 – Felting the Pieces
After the wall repair putty set, I made the base surface smooth with some careful light sanding. The felt that worked was for me was a self-adhesive felt sheet that is 1.4 mm thick. There are two ways of putting the felt on the pieces – just pulling off the paper backing and sticking all the pieces on! Then with very fine scissors, you can trim the excess felt off each piece, using the wood on the base as a guide.
The second, slightly neater, but more time consumer way, is the measure out the base of each piece on the felt backing paper, and then trim out each individual circular felt first.
When this was done, I thought I was done… but then disaster struck!
Part 5 – FINALE – IT’S DONE!
After I put on the felt, I faced one final hurdle. The white king piece was inconsistently detected by the board… 😢 After removing the felt, I found the problem. During the installation process, I had damaged the sensor at some point, with a corner of the surface chipped off. 😞
However, I found a solution! With my new pieces, I wasn’t intending on using the included chessmen with the Chessnut PRO. So, I sacrificed the original Chessnut PRO white king, harvested its sensor, and successfully transplanted it into my new king! 🤣
It’s over… it’s done! 🥲 After 40-50 hours of effort, it’s finally completed! And the result is fantastic!
Lessons
Where possible, try to avoid having to remove the metal weights from pieces. The “hot water dip” method does make it a lot easier and with most pieces at the end, I was able to get the weights out within 4-5 minutes. Nonetheless, it’s still a very tedious process, and you have to be very careful to not damage the finish of the pieces or crack the base rim. Furthermore, even with the “hot water dip” method, there may be a few pieces in the set of chessmen that can be very difficult to work with. For me, the black king piece had a very tightly fitted metal weight.
On the Chessnut Backers Group on Facebook, Tobias Lindenmeir discovered that Mr Sarbjeet Singh from Amritsar India, where the best handmade chess pieces are produced in the world, of the INDIACHESSART Etsy Store will customise wooden pieces with a drilled hole, ready for Chessnut sensor chips! This is undoubtedly the simplest and most expedient path forward!
Alternatively, if you can find a chess manufacturer who are willing to simply not install the metal weights and felt, this is definitely a good option as well. The advantage with this is that you might get a larger range of chess piece, and can increase the weight of the piece with a non-metal weight. You’ll still need to use a drill or a dremel to make space for the tip of the sensor, but this is very simple to do, and shouldn’t take more than a minute or so per piece.
To fill the void in this setting, I wouldn’t use the air drying clay that I did in my process. An epoxy putty (e.g., Tamiya Epoxy Putty) would be an effective permanently fixed solution. For my re-done white king, I filled the void with Blu-Tack, an commonly used and very inexpensive local Australian product which is a type of reusable adhesive putty. This worked very well, had no mess, and actually provided more weight than the clay!
Final piece weights
The clay in the void does nicely improve the weight of pieces, roughly by an additional third compared to the original pieces. It also improves the balance of the pieces as the centre of balance is towards the base. Notably, Blu Tack seems to add more weight than the clay – with my white king a few grams heavier than the black!
| Zagreb ’59 chessmen | Chessnut PRO original | |
| King | 38 g | 31 g |
| Queen | 28 g | 24 g |
| Rook | 21 g | 17 g |
| Bishop | 23 g | 15 g |
| Knight | 30 g | 22 g |
| Pawn | 14 g | 10 g |
Thank you for coming along the journey with me! I hope that some of this is useful and feel free to ask questions!

[…] 5-part series creating custom pieces using the Zagreb ’59 Series chessmen:https://adventuresofachessnoob.com/2023/05/21/creating-custom-chess-pieces-for-the-chessnut-pro/ […]
LikeLike
[…] I’ve personally made two sets of custom chessmen for my Chessnut PRO, one using the Zagreb ’59 set, and another with an Austrian/Vienna Coffee House […]
LikeLike